Home > Arts > Artists > D > Frank Dadd
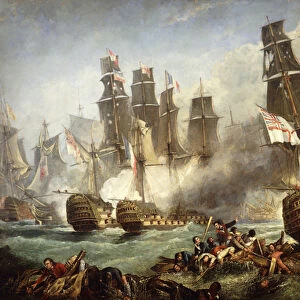
The Final Blow to Mahdism, the Battle of Omdurman, Panoramic View of the Main Attack (engraving)
")
![]()
Wall Art and Photo Gifts from Fine Art Finder
The Final Blow to Mahdism, the Battle of Omdurman, Panoramic View of the Main Attack (engraving)
1063686 The Final Blow to Mahdism, the Battle of Omdurman, Panoramic View of the Main Attack (engraving) by Dadd, Frank (1851-1929) (after); Private Collection; (add.info.: The Final Blow to Mahdism, the Battle of Omdurman, Panoramic View of the Main Attack. Illustration for The Graphic, 1 October 1898.); Look and Learn / Illustrated Papers Collection
Media ID 23514374
© Look and Learn / Illustrated Papers Collection / Bridgeman Images
21st Lancers Battle Of Omdurman Bearers Blue Nile Brigade Bullets Cavalry Regiment Cavalrymen Clarke Clockwork Commanded Dervish Dervishes Egyptian Army Fired Firing Gallantry Hailstorm Heaps Hospital Hurrying Khartoum Lewis Medical Supplies Meet Midst Nicholson Omdurman Panoramic View Powder Rifles Rocks Rushes Shells Sirdar Spears Spot Staff Standard Storming Support Troop Wounded Limb Zeriba Asclepius Asklepieion Asklepios Camerons Egyptians Healthcare Injuries Lincolns Mahdis Tomb Medical Science Medical Services Physical Health Seaforths Warwicks Wound Wounded
FEATURES IN THESE COLLECTIONS
> Arts
> Artists
> D
> Frank Dadd
> Arts
> Artists
> Related Images
> Europe
> United Kingdom
> Related Images
> Fine Art Finder
> Artists
> English School
> Fine Art Finder
> Artists
> Frank (after) Dadd
> Fine Art Finder
> Temp Classification
> Historic
> Egyptian pyramids and tombs
The Final Blow to Mahdism, the Battle of Omdurman - A Panoramic View of the Main Attack
EDITORS COMMENTS
. This engraving captures the climactic moment in history when Mahdism met its ultimate defeat at the Battle of Omdurman. The artist, Frank Dadd, skillfully depicts the chaos and intensity of this pivotal event that took place on October 1,1898. In this panoramic view, we witness a scene filled with rushes and bullets as dervish cavalry wheel around amidst a storming British brigade. The clockwork precision of the 21st Lancers and Egyptian army is evident as they bravely face off against waves of dervishes commanded by their leader. The image showcases gallantry on both sides; Egyptian troops hurrying across the Blue Nile to support their comrades while wounded soldiers are carried away from the battlefield. Specks of dust rise from shells hitting ruins in Khartoum as warwicks fire upon dervish reserves. Amidst all this turmoil, General Wauchope and Major Williams can be seen leading their respective brigades with unwavering determination. From Heliograph Hill to Jebel Surgham, every inch is fought for fiercely by British forces including General MacDonald's Brigade and General Lewis's Brigade. As smoke billows from howitzer batteries firing relentlessly, one cannot help but feel awe at the sheer scale and magnitude of this historic clash. The black flag representing Khalifa's reign flutters ominously above Mahdi's tomb while zeribas crumble under relentless assault. This engraving serves as a testament to bravery and sacrifice exhibited by those who fought in this battle - a final blow that marked an end to Mahdism once and for all.
MADE IN THE UK
Safe Shipping with 30 Day Money Back Guarantee
FREE PERSONALISATION*
We are proud to offer a range of customisation features including Personalised Captions, Color Filters and Picture Zoom Tools
SECURE PAYMENTS
We happily accept a wide range of payment options so you can pay for the things you need in the way that is most convenient for you
* Options may vary by product and licensing agreement. Zoomed Pictures can be adjusted in the Basket.