Home > Europe > United Kingdom > England > London > Transport > Railway
Scenes of the Second Boer War (b / w photo)
")
![]()
Wall Art and Photo Gifts from Fine Art Finder
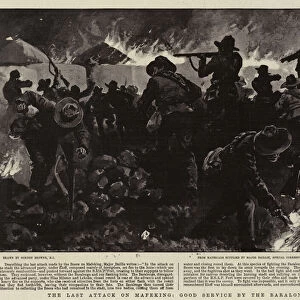
Scenes of the Second Boer War (b / w photo)
1592839 Scenes of the Second Boer War (b/w photo) by English Photographer, (19th century); Private Collection; (add.info.: Scenes of the Second Boer War. Illustration for The Illustrated London News, 4 November 1899.
English Photographer (19th Century)); Look and Learn / Illustrated Papers Collection
Media ID 23396576
© Look and Learn / Illustrated Papers Collection / Bridgeman Images
Armoured Train Colonel Baden Powell Defence Mafeking Market Square National Bank Second Boer War Harrismith
FEATURES IN THESE COLLECTIONS
> Africa
> South Africa
> Related Images
> Architecture
> Country
> Africa
> Arts
> Artists
> Related Images
> Europe
> United Kingdom
> England
> London
> Transport
> Railway
> Fine Art Finder
> Artists
> English Photographer
> Fine Art Finder
> Artists
> Joseph Holland Tringham
EDITORS COMMENTS
This print captures the intense scenes of the Second Boer War, taken by an English photographer in the 19th century. The image showcases a pivotal moment in history, depicting various elements that defined this conflict. From national banks to railways and armoured trains, it highlights the mobilization efforts on September 29,1899. The military presence is evident with soldiers from Natal Carbinners preparing for defence at Bucks Hotel. Colonel Baden Powell can be seen strategizing amidst the breathtaking mountainous backdrop. The market square bustles with activity as civilians go about their daily lives under snowy conditions. The photograph also features significant figures such as Mr Wallis and Captain Llewellyn, adding a personal touch to this historical documentation. Mafeking and Harrismith serve as prominent locations within South Africa during this war. Colonel Nicholson's leadership is showcased alongside architectural structures like Bethlehem Coach, providing insight into both military strategy and local infrastructure during this time period. Through its meticulous composition and attention to detail, this image offers viewers a glimpse into one of the most consequential conflicts of its era. It serves as a testament to the power of photography in preserving moments that shape our understanding of history.
MADE IN THE UK
Safe Shipping with 30 Day Money Back Guarantee
FREE PERSONALISATION*
We are proud to offer a range of customisation features including Personalised Captions, Color Filters and Picture Zoom Tools
SECURE PAYMENTS
We happily accept a wide range of payment options so you can pay for the things you need in the way that is most convenient for you
* Options may vary by product and licensing agreement. Zoomed Pictures can be adjusted in the Basket.