Home > Africa > South Africa > Maps
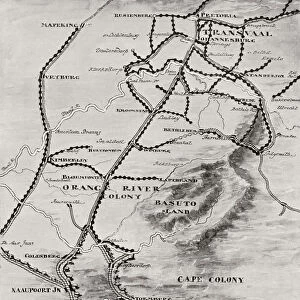
Map of parts of South Africa, 1900

![]()
Wall Art and Photo Gifts from Mary Evans Picture Library
Map of parts of South Africa, 1900
Map of parts of South Africa, 1900 (c). Published by G W Bacon, 1900. Associated with Lt Col H H C Dent, 1/3 North Midland Field Ambulance, Boer War (1899-1902). The main area of the map is of the Transvaal and Orange Free State, with insets of Ladysmith, northern Natal, and a general map of South Africa. Inside the main cover is a leaflet on ?The South African Crisis?. Date: 1900
Mary Evans Picture Library makes available wonderful images created for people to enjoy over the centuries
Media ID 14403773
© The National Army Museum / Mary Evans Picture Library
1899 Ambulance Area Associated Bacon Boer Dent Main Midland Parts 1902
FEATURES IN THESE COLLECTIONS
> Africa
> South Africa
> Maps
EDITORS COMMENTS
This intriguing map print, published by G W Bacon in 1900, offers a glimpse into the complex political landscape of South Africa during the height of the Second Boer War (1899-1902). The map's main focus is on the Transvaal and Orange Free State regions, with insets providing closer views of Ladysmith and northern Natal. The map's historical significance is further enhanced by its association with Lt Col H H C Dent of the 1/3 North Midland Field Ambulance, who served during the conflict. The map's cover bears a leaflet titled "The South African Crisis," providing insight into the context of the map's creation. The Boer Wars were a series of conflicts between the British and two independent Boer states, the Transvaal and the Orange Free State, over control of the mineral-rich territories. The Second Boer War began in October 1899 and lasted until May 1902, resulting in British victory but at a great cost to both sides. This map serves as an essential historical document, illustrating the political divisions and military campaigns of the time. Its detailed topography and annotated features, such as railways, roads, and rivers, offer valuable information for understanding the logistical challenges faced by military forces during the war. The map's historical context, association with a military officer, and intriguing title make it a fascinating addition to any collection focused on South African history or the Boer Wars.
MADE IN THE UK
Safe Shipping with 30 Day Money Back Guarantee
FREE PERSONALISATION*
We are proud to offer a range of customisation features including Personalised Captions, Color Filters and Picture Zoom Tools
SECURE PAYMENTS
We happily accept a wide range of payment options so you can pay for the things you need in the way that is most convenient for you
* Options may vary by product and licensing agreement. Zoomed Pictures can be adjusted in the Basket.