Home > Europe > United Kingdom > Scotland > Edinburgh > Edinburgh
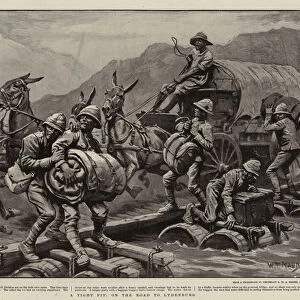
Map Showing District Between Johannesburg and Pretoria, and the Position of the British

![]()
Wall Art and Photo Gifts from Heritage Images
Map Showing District Between Johannesburg and Pretoria, and the Position of the British
Map Showing District Between Johannesburg and Pretoria, and the Position of the British Forces Round the Latter, 1901. From " South Africa and the Transvaal War, Vol. V", by Louis Creswicke. [T. C. & E. C. Jack, Edinburgh, 1901]
Heritage Images features heritage image collections
Media ID 19781233
© The Print Collector/Heritage Images
1899 1902 2nd Boer War Bamp W Boer Wars British Army Creswicke Gauteng Jack Johannesburg Louis Louis Creswicke Occupied Territory Position Pretoria Second Boer War Second Transvaal War South Africa South Africa And The Transvaal War South African Strategic Strategy Tc And Ec Tc And Ec Jack Territorial Territory Transvaal British Empire
FEATURES IN THESE COLLECTIONS
> Africa
> South Africa
> Johannesburg
> Africa
> South Africa
> Maps
> Africa
> South Africa
> Pretoria
> Arts
> Literature
> Books
> Arts
> Literature
> Europe
> United Kingdom
> Scotland
> Edinburgh
> Edinburgh
> Europe
> United Kingdom
> Scotland
> Lothian
> Edinburgh
EDITORS COMMENTS
This print showcases a historic map titled "Map Showing District Between Johannesburg and Pretoria, and the Position of the British Forces Round the Latter, 1901". Taken from Louis Creswicke's renowned book "South Africa and the Transvaal War" this image offers a glimpse into an important chapter in South African history. The photograph captures the strategic positioning of British forces during the Second Boer War. It depicts a detailed territorial layout between Johannesburg and Pretoria, highlighting key locations occupied by both sides. The map serves as a visual representation of military strategy employed by Britain to gain control over this region. With its intricate details and Victorian-era aesthetic, this print transports viewers back to early 20th century colonial times. It symbolizes not only armed conflict but also the broader concepts of imperialism and colonialism that characterized that era. Louis Creswicke's work is highly regarded for its comprehensive account of South Africa's tumultuous past. This particular image provides valuable insight into one aspect of the Second Boer War – showcasing how geographical knowledge played a crucial role in shaping military tactics. As we admire this historical artifact, it reminds us of South Africa's complex journey towards independence while shedding light on significant events that shaped its future trajectory.
MADE IN THE UK
Safe Shipping with 30 Day Money Back Guarantee
FREE PERSONALISATION*
We are proud to offer a range of customisation features including Personalised Captions, Color Filters and Picture Zoom Tools
SECURE PAYMENTS
We happily accept a wide range of payment options so you can pay for the things you need in the way that is most convenient for you
* Options may vary by product and licensing agreement. Zoomed Pictures can be adjusted in the Basket.