Fraud Blocker Skip to main content

West Australian Collection

"West Australian

Background imageWest Australian Collection: Eastern Geelong (colour photo)

Eastern Geelong (colour photo)
7166499 Eastern Geelong (colour photo) by Australian Photographer (20th century); Private Collection; (add.info.: Eastern Geelong)

Background imageWest Australian Collection: Pamir, one of the last commercial sailing ships, off Sydney Heads, Australia (b / w photo)

Pamir, one of the last commercial sailing ships, off Sydney Heads, Australia (b / w photo)
7156948 Pamir, one of the last commercial sailing ships, off Sydney Heads, Australia (b/w photo) by Australian Photographer (20th century); Private Collection; (add.info.: Pamir)

Background imageWest Australian Collection: One with Britain, Heart and Soul, One Life, One Flag, One Throne, Tennyson (engraving)

One with Britain, Heart and Soul, One Life, One Flag, One Throne, Tennyson (engraving)
1039708 One with Britain, Heart and Soul, One Life, One Flag, One Throne, Tennyson (engraving) by English School, (19th century); Private Collection; (add.info.: One with Britain, Heart and Soul)

Background imageWest Australian Collection: Sydney Hospital, Macquarie Street (b / w photo)

Sydney Hospital, Macquarie Street (b / w photo)
7155617 Sydney Hospital, Macquarie Street (b/w photo) by Australian Photographer, (19th century); Private Collection; (add.info.: Sydney Hospital, Macquarie Street)

Background imageWest Australian Collection: Warrnambool (colour photo)

Warrnambool (colour photo)
7166508 Warrnambool (colour photo) by Australian Photographer (20th century); Private Collection; (add.info.: Warrnambool)

Background imageWest Australian Collection: Two-Fold Bay, Boyd, New South Wales (engraving)

Two-Fold Bay, Boyd, New South Wales (engraving)
1594515 Two-Fold Bay, Boyd, New South Wales (engraving) by English School, (19th century); Private Collection; (add.info.: Two-Fold Bay, Boyd, New South Wales)

Background imageWest Australian Collection: The Sydney Harbour Bridge under construction, New South Wales, Australia, 1929-1930 (b / w photo)

The Sydney Harbour Bridge under construction, New South Wales, Australia, 1929-1930 (b / w photo)
6014783 The Sydney Harbour Bridge under construction, New South Wales, Australia, 1929-1930 (b/w photo) by Australian Photographer (20th century); Private Collection; (add.info)

Background imageWest Australian Collection: Page 133. A very small Egyptian mummy in its coffin;an antient vase found in the ruins of

Page 133. A very small Egyptian mummy in its coffin;an antient vase found in the ruins of Herculaneum;a Chinese
5670052 Page 133.A very small Egyptian mummy in its coffin; an antient vase found in the ruins of Herculaneum; a Chinese parasol, 1810-17 (w/c & manuscript text) by Digby

Background imageWest Australian Collection: Page 132. An Egyptian mummy in its coffin, 1810-17 (w/c & manuscript text)

Page 132. An Egyptian mummy in its coffin, 1810-17 (w/c & manuscript text)
5670051 Page 132. An Egyptian mummy in its coffin, 1810-17 (w/c & manuscript text) by Digby, Kenelm Henry (1800-80); 39.6x25.2x5.4 cm; Mitchell Library

Background imageWest Australian Collection: Billy Blue, 1834 (oil)

Billy Blue, 1834 (oil)
7273687 Billy Blue, 1834 (oil) by East, J.B. (19th century); 63x50.2 cm; Mitchell Library, State Library of New South Wales; (add.info.: CREATOR: J. B)

Background imageWest Australian Collection: Billy Blue, 1834 (oil)

Billy Blue, 1834 (oil)
7273686 Billy Blue, 1834 (oil) by East, J.B. (19th century); 63x50.2 cm; Mitchell Library, State Library of New South Wales; (add.info.: CREATOR: J. B)

Background imageWest Australian Collection: Australia and New Zealand. New Holland. Map

Australia and New Zealand. New Holland. Map
7269228 Australia and New Zealand. New Holland. Map. by Faden, William (1750-1836); Private Collection; (add.info.: New Holland with the adjacent Polynesia)

Background imageWest Australian Collection: A Bergamo miner taken from a flooded mine, in Australia, after nine days of burial (colour litho)

A Bergamo miner taken from a flooded mine, in Australia, after nine days of burial (colour litho)
2815007 A Bergamo miner taken from a flooded mine, in Australia, after nine days of burial (colour litho) by Beltrame, Achille (1871-1945); Private Collection; (add.info)

Background imageWest Australian Collection: Sheep-shearing, Australia (litho)

Sheep-shearing, Australia (litho)
7191846 Sheep-shearing, Australia (litho) by Macfarlane, John (1857-1936); Private Collection; (add.info.: Sheep-shearing, Australia)

Background imageWest Australian Collection: Tetratheca glandulosa

Tetratheca glandulosa
6338133 Tetratheca glandulosa by Stanghi (19th century); (add.info.: Tetratheca glandulosa, Tetrateca glandulosa. Handcoloured copperplate stipple engraving from Antoine Laurent de Jussieus)

Background imageWest Australian Collection: The Royal Commission on the South African War, a Sitting at Westminster (litho)

The Royal Commission on the South African War, a Sitting at Westminster (litho)
1601159 The Royal Commission on the South African War, a Sitting at Westminster (litho) by Wilson, Thomas Walter (1851-1912); Private Collection; (add.info)

Background imageWest Australian Collection: F. 31 Tylophora biglandolusa;Melodinus apoconaceae, c. 1790-95 (ink & w / c on paper)

F. 31 Tylophora biglandolusa;Melodinus apoconaceae, c. 1790-95 (ink & w / c on paper)
5671560 F.31 Tylophora biglandolusa; Melodinus apoconaceae, c.1790-95 (ink & w/c on paper) by Doody, John (fl.1790-99) (attr)

Background imageWest Australian Collection: F. 20 Phormium tanax, c. 1790-95 (ink & w / c)

F. 20 Phormium tanax, c. 1790-95 (ink & w / c)
5671558 F.20 Phormium tanax, c.1790-95 (ink & w/c) by Doody, John (fl.1790-99) (attr. to); Mitchell Library, State Library of New South Wales; (add.info.: Series 01: Flora of Norfolk Island, ca)

Background imageWest Australian Collection: F. 26 Ipomoea cairica;Planchonella costata Bastard ironwood, c. 1790-95 (ink & w / c on paper)

F. 26 Ipomoea cairica;Planchonella costata Bastard ironwood, c. 1790-95 (ink & w / c on paper)
5671555 F.26 Ipomoea cairica; Planchonella costata Bastard ironwood, c.1790-95 (ink & w/c on paper) by Doody, John (fl.1790-99) (attr)

Background imageWest Australian Collection: F. 35 Freycinetia baueriana, c. 1790-95(w / c & ink on paper)

F. 35 Freycinetia baueriana, c. 1790-95(w / c & ink on paper)
5671334 F.35 Freycinetia baueriana, c.1790-95(w/c & ink on paper) by Doody, John (fl.1790-99) (attr. to); 39.7x50.3 cm; Mitchell Library

Background imageWest Australian Collection: F. 34 Freycinetia baueriana, c. 1790-95 (w / c & ink on paper)

F. 34 Freycinetia baueriana, c. 1790-95 (w / c & ink on paper)
5671333 F.34 Freycinetia baueriana, c.1790-95 (w/c & ink on paper) by Doody, John (fl.1790-99) (attr. to); 47.6x60.1 cm; Mitchell Library

Background imageWest Australian Collection: F. 28 Ungeria floribunda, c. 1790-95 (w / c & ink on paper)

F. 28 Ungeria floribunda, c. 1790-95 (w / c & ink on paper)
5671327 F.28 Ungeria floribunda, c.1790-95 (w/c & ink on paper) by Doody, John (fl.1790-99) (attr. to); 47.7x59.8 cm; Mitchell Library

Background imageWest Australian Collection: F. 17 Boehmeria Australis;Geitonoplesium cymosum, c. 1790-95 (w / c & ink on paper)

F. 17 Boehmeria Australis;Geitonoplesium cymosum, c. 1790-95 (w / c & ink on paper)
5671316 F.17 Boehmeria Australis; Geitonoplesium cymosum, c.1790-95 (w/c & ink on paper) by Doody, John (fl.1790-99) (attr)

Background imageWest Australian Collection: F. 12 Pisonia umbelliferia, c. 1790-95 (w / c & ink on paper)

F. 12 Pisonia umbelliferia, c. 1790-95 (w / c & ink on paper)
5671311 F.12 Pisonia umbelliferia, c.1790-95 (w/c & ink on paper) by Doody, John (fl.1790-99) (attr. to); 47.6x60.1 cm; Mitchell Library

Background imageWest Australian Collection: F. 10 Solanum bauerianum;Solanum aviculare, c. 1790-95 (w / c & ink on paper)

F. 10 Solanum bauerianum;Solanum aviculare, c. 1790-95 (w / c & ink on paper)
5671309 F.10 Solanum bauerianum; Solanum aviculare, c.1790-95 (w/c & ink on paper) by Doody, John (fl.1790-99) (attr. to); 47x60.3 cm; Mitchell Library

Background imageWest Australian Collection: F. 9 Plumbagus xylenica;Procris montana, c. 1790-95 (w / c & ink on paper)

F. 9 Plumbagus xylenica;Procris montana, c. 1790-95 (w / c & ink on paper)
5671308 F.9 Plumbagus xylenica; Procris montana, c.1790-95 (w/c & ink on paper) by Doody, John (fl.1790-99) (attr. to); Mitchell Library

Background imageWest Australian Collection: Page 507. The Lama, copied from a living animal exhibited in Dublin

Page 507. The Lama, copied from a living animal exhibited in Dublin, 1810-17 (w / c & manuscript text)
5670243 Page 507. The Lama, copied from a living animal exhibited in Dublin, 1810-17 (w/c & manuscript text) by Digby, Kenelm Henry (1800-80); 39.6x25.2x5.4 cm; Mitchell Library

Background imageWest Australian Collection: Page 499. The Place, 1810-17 (w / c & manuscript text)

Page 499. The Place, 1810-17 (w / c & manuscript text)
5670240 Page 499. The Place, 1810-17 (w/c & manuscript text) by Digby, Kenelm Henry (1800-80); 39.6x25.2x5.4 cm; Mitchell Library

Background imageWest Australian Collection: Page 447. The Capricorn Beetle;the Yellow Lamia;the Broad Water Beetle;the Oculator Lamia;the

Page 447. The Capricorn Beetle;the Yellow Lamia;the Broad Water Beetle;the Oculator Lamia;the Menelaus Butterfly;the
5670233 Page 447. The Capricorn Beetle; the Yellow Lamia; the Broad Water Beetle; the Oculator Lamia; the Menelaus Butterfly; the Orange tipped Butterfly, 1810-17 (w/c & manuscript text) by Digby

Background imageWest Australian Collection: Page 443. The Coluber Doliatus;the Blue Headed Snake, 1810-17 (w / c & manuscript text)

Page 443. The Coluber Doliatus;the Blue Headed Snake, 1810-17 (w / c & manuscript text)
5670229 Page 443. The Coluber Doliatus; the Blue Headed Snake, 1810-17 (w/c & manuscript text) by Digby, Kenelm Henry (1800-80); 39.6x25.2x5.4 cm; Mitchell Library

Background imageWest Australian Collection: Page 395. The Pintado, or Guinea Hen, 1810-17 (w / c & manuscript text)

Page 395. The Pintado, or Guinea Hen, 1810-17 (w / c & manuscript text)
5670202 Page 395. The Pintado, or Guinea Hen, 1810-17 (w/c & manuscript text) by Digby, Kenelm Henry (1800-80); 39.6x25.2x5.4 cm; Mitchell Library

Background imageWest Australian Collection: Page 364. The Greyhound Fox, 1810-17 (w / c & manuscript text)

Page 364. The Greyhound Fox, 1810-17 (w / c & manuscript text)
5670187 Page 364. The Greyhound Fox, 1810-17 (w/c & manuscript text) by Digby, Kenelm Henry (1800-80); 39.6x25.2x5.4 cm; Mitchell Library

Background imageWest Australian Collection: Page 356. White throated Kings Fisher;Lesser Butcher Bird, 1810-17 (w / c & manuscript text)

Page 356. White throated Kings Fisher;Lesser Butcher Bird, 1810-17 (w / c & manuscript text)
5670179 Page 356. White throated Kings Fisher; Lesser Butcher Bird, 1810-17 (w/c & manuscript text) by Digby, Kenelm Henry (1800-80); 39.6x25.2x5.4 cm; Mitchell Library

Background imageWest Australian Collection: Page 350. The Black Ouzel. Black Bird, 1810-17 (w / c & manuscript text)

Page 350. The Black Ouzel. Black Bird, 1810-17 (w / c & manuscript text)
5670174 Page 350. The Black Ouzel. Black Bird, 1810-17 (w/c & manuscript text) by Digby, Kenelm Henry (1800-80); 39.6x25.2x5.4 cm; Mitchell Library

Background imageWest Australian Collection: Page 345. The Roller, 1810-17 (w / c & manuscript text)

Page 345. The Roller, 1810-17 (w / c & manuscript text)
5670171 Page 345. The Roller, 1810-17 (w/c & manuscript text) by Digby, Kenelm Henry (1800-80); 39.6x25.2x5.4 cm; Mitchell Library

Background imageWest Australian Collection: Page 338. The Three toe d Woodpecker, 1810-17 (w / c & manuscript text)

Page 338. The Three toe d Woodpecker, 1810-17 (w / c & manuscript text)
5670165 Page 338. The Three toe d Woodpecker, 1810-17 (w/c & manuscript text) by Digby, Kenelm Henry (1800-80); 39.6x25.2x5.4 cm; Mitchell Library

Background imageWest Australian Collection: Page 336. The Great Black Woodpecker, 1810-17 (w / c & manuscript text)

Page 336. The Great Black Woodpecker, 1810-17 (w / c & manuscript text)
5670161 Page 336. The Great Black Woodpecker, 1810-17 (w/c & manuscript text) by Digby, Kenelm Henry (1800-80); 39.6x25.2x5.4 cm; Mitchell Library

Background imageWest Australian Collection: Page 332. The Skunk, 1810-17 (w / c & manuscript text)

Page 332. The Skunk, 1810-17 (w / c & manuscript text)
5670159 Page 332. The Skunk, 1810-17 (w/c & manuscript text) by Digby, Kenelm Henry (1800-80); 39.6x25.2x5.4 cm; Mitchell Library

Background imageWest Australian Collection: Page 330. The Shoveler, 1810-17 (w / c & manuscript text)

Page 330. The Shoveler, 1810-17 (w / c & manuscript text)
5670158 Page 330. The Shoveler, 1810-17 (w/c & manuscript text) by Digby, Kenelm Henry (1800-80); 39.6x25.2x5.4 cm; Mitchell Library

Background imageWest Australian Collection: Page 323. Certia Formosa, 1810-17 (w / c & manuscript text)

Page 323. Certia Formosa, 1810-17 (w / c & manuscript text)
5670154 Page 323. Certia Formosa, 1810-17 (w/c & manuscript text) by Digby, Kenelm Henry (1800-80); 39.6x25.2x5.4 cm; Mitchell Library

Background imageWest Australian Collection: Page 319. The Teal, 1810-17 (w / c & manuscript text)

Page 319. The Teal, 1810-17 (w / c & manuscript text)
5670152 Page 319. The Teal, 1810-17 (w/c & manuscript text) by Digby, Kenelm Henry (1800-80); 39.6x25.2x5.4 cm; Mitchell Library

Background imageWest Australian Collection: Page 310. Green Macaw, copied from a living bird, exhibited in Dublin

Page 310. Green Macaw, copied from a living bird, exhibited in Dublin, 1810-17 (w / c & manuscript text)
5670149 Page 310. Green Macaw, copied from a living bird, exhibited in Dublin, 1810-17 (w/c & manuscript text) by Digby, Kenelm Henry (1800-80); 39.6x25.2x5.4 cm; Mitchell Library

Background imageWest Australian Collection: Page 289. Common Grey Parrot, copied from a living bird, exhibited in Dublin

Page 289. Common Grey Parrot, copied from a living bird, exhibited in Dublin, 1810-17 (w / c & manuscript text)
5670131 Page 289. Common Grey Parrot, copied from a living bird, exhibited in Dublin, 1810-17 (w/c & manuscript text) by Digby, Kenelm Henry (1800-80); 39.6x25.2x5.4 cm; Mitchell Library

Background imageWest Australian Collection: Page 268. The Golden Oriole, 1810-17 (w / c & manuscript text)

Page 268. The Golden Oriole, 1810-17 (w / c & manuscript text)
5670121 Page 268. The Golden Oriole, 1810-17 (w/c & manuscript text) by Digby, Kenelm Henry (1800-80); 39.6x25.2x5.4 cm; Mitchell Library

Background imageWest Australian Collection: Page 255. The Little Grebe, 1810-17 (w / c & manuscript text)

Page 255. The Little Grebe, 1810-17 (w / c & manuscript text)
5670112 Page 255. The Little Grebe, 1810-17 (w/c & manuscript text) by Digby, Kenelm Henry (1800-80); 39.6x25.2x5.4 cm; Mitchell Library

Background imageWest Australian Collection: Page 251. The female Golden, and Pied Pheasant. 1810-17 (w / c & manuscript text)

Page 251. The female Golden, and Pied Pheasant. 1810-17 (w / c & manuscript text)
5670111 Page 251. The female Golden, and Pied Pheasant. 1810-17 (w/c & manuscript text) by Digby, Kenelm Henry (1800-80); 39.6x25.2x5.4 cm; Mitchell Library

Background imageWest Australian Collection: Page 243. The White Owl, Barn Owl, or Church Owl, 1810-17 (w / c & manuscript text)

Page 243. The White Owl, Barn Owl, or Church Owl, 1810-17 (w / c & manuscript text)
5670108 Page 243. The White Owl, Barn Owl, or Church Owl, 1810-17 (w/c & manuscript text) by Digby, Kenelm Henry (1800-80); 39.6x25.2x5.4 cm; Mitchell Library


All Professionally Made to Order for Quick Shipping

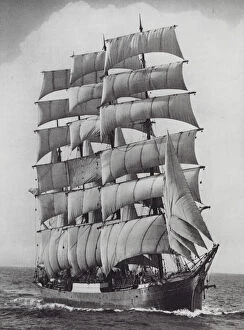
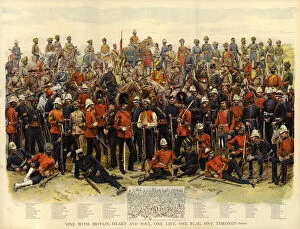
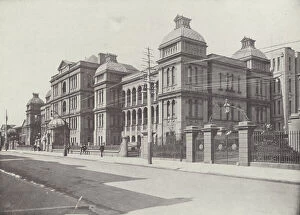
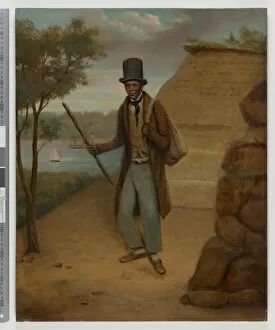
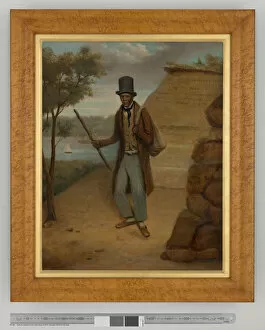
"West Australian: A Journey Through Time and Culture" Step into the captivating world of Western Australia through a collection of diverse images and artifacts that tell stories of history, adventure, and resilience. Eastern Geelong welcomes us with its vibrant colors, showcasing the region's natural beauty and inviting us to explore its hidden treasures. Meanwhile, Sydney Hospital on Macquarie Street takes us back in time with a black-and-white photograph, reminding us of the city's rich heritage. Warrnambool beckons with another burst of color, capturing the essence of this coastal town where land meets sea in perfect harmony. And as we venture further south to Two-Fold Bay in Boyd, New South Wales, an enchanting engraving transports us to a bygone era filled with maritime tales and seafaring adventures. The construction site of the iconic Sydney Harbour Bridge comes alive before our eyes in a monochromatic snapshot from 1929-1930. Witnessing this monumental feat reminds us of human ingenuity and determination. Turning over to page 133 reveals intriguing glimpses into ancient civilizations - a small Egyptian mummy nestled within its coffin alongside an antique vase discovered amidst Herculaneum's ruins. The delicate strokes of watercolor bring life to these relics while manuscript text adds depth to their historical significance. Page 132 unveils yet another Egyptian mummy resting peacefully inside its ornate coffin. These preserved remnants offer insights into ancient burial practices that continue to fascinate scholars and enthusiasts alike. Billy Blue emerges twice on canvas - his portrait painted in oil immortalizes this enigmatic figure who left his mark on Australian history during the early 19th century. An old map depicting Australia and New Zealand as "New Holland" reminds us how perceptions have evolved over time; it serves as a testament to explorers' courage who ventured into unknown territories shaping our understanding today.