Fraud Blocker Skip to main content

Strategic Collection (page 5)

"Unleashing the Power of Strategy: Aerial Forces in Action" In this captivating snapshot

Background imageStrategic Collection: Republic F-84F Thunderstreak

Republic F-84F Thunderstreak
(ex Missouri Air National Guard) - Republic F-84F-30-GK Thunderstreak 51-9422, late of the 110th Fighter Squadron, on gate guard duties at St. Louis Air National Guard Base, MO

Background imageStrategic Collection: United States Air Force - Boeing RB-52B Stratofortress

United States Air Force - Boeing RB-52B Stratofortress
United States Air Force - Boeing RB-52B-30-BO Stratofortress 53-0377 (msn 16856), of Strategic Air Command. Date: circa 1959

Background imageStrategic Collection: The Mamelon Vert, 1855-1856. Creator: James Robertson

The Mamelon Vert, 1855-1856. Creator: James Robertson
The Mamelon Vert, 1855-1856

Background imageStrategic Collection: Orchard Knob from Mission Ridge, 1864-1866. Creator: George N. Barnard

Orchard Knob from Mission Ridge, 1864-1866. Creator: George N. Barnard
Orchard Knob from Mission Ridge, 1864-1866. strategic lookout used by General Grant during the " Battle Above The Clouds"

Background imageStrategic Collection: Plate 8: Alexander Encircling the Enemy Troops with Fire

Plate 8: Alexander Encircling the Enemy Troops with Fire, from The Deeds of Alexander the Great, 1608

Background imageStrategic Collection: Grand Review, Phoenix Park, Dublin, 1844. Creator: Unknown

Grand Review, Phoenix Park, Dublin, 1844. Creator: Unknown
Grand Review, Phoenix Park, Dublin, 1844....a review of the troops composing the garrison of Dublin took place in the Fifteen Acres

Background imageStrategic Collection: The Council of War on the Morning of the Taking of the Mamelon

The Council of War on the Morning of the Taking of the Mamelon. Lord Raglan, Omar Pasha, Marshal Pelissier, 1855

Background imageStrategic Collection: MG0552 Travel Tourism Holiday Vacation Explore

MG0552 Travel Tourism Holiday Vacation Explore
Cannons, the noon day gun, Saluting Battery, Upper Barracca Gardens, and Grand Harbour, Valletta, Malta

Background imageStrategic Collection: EyeUbiquitous_20107927

EyeUbiquitous_20107927
England, East Sussex, Beachy Head, Vulcan Jet Bomber taking part in the Airbourne air show

Background imageStrategic Collection: The Battlefields of Pretoria. (From a personal survey). 1901. Creator: Unknown

The Battlefields of Pretoria. (From a personal survey). 1901. Creator: Unknown
The Battlefields of Pretoria. (From a personal survey). 1901. From " South Africa and the Transvaal War, Vol. VI", by Louis Creswicke. [T. C. & E. C. Jack, Edinburgh, 1901]

Background imageStrategic Collection: Map of the Seat of War, 1901. Creator: Unknown

Map of the Seat of War, 1901. Creator: Unknown
Map of the Seat of War, 1901. From " South Africa and the Transvaal War, Vol. VI", by Louis Creswicke. [T. C. & E. C. Jack, Edinburgh, 1901]

Background imageStrategic Collection: Map Illustrating General Bullers Campaign in Natal - May-June 1900, 1901. Creator: Unknown

Map Illustrating General Bullers Campaign in Natal - May-June 1900, 1901. Creator: Unknown
Map Illustrating General Bullers Campaign in Natal - May-June 1900, 1901. From " South Africa and the Transvaal War, Vol. VI", by Louis Creswicke. [T. C. & E. C. Jack, Edinburgh, 1901]

Background imageStrategic Collection: Map Illustrating the Operations on the Orange River, 1900. Creator: Unknown

Map Illustrating the Operations on the Orange River, 1900. Creator: Unknown
Map Illustrating the Operations on the Orange River, 1900. British forces entered the territory of the Orange Free State and occupied the capital Bloemfontein on 13 March 1900

Background imageStrategic Collection: Balloon Map Illustrating the Battle of Pieters and Relief of Ladysmith, 1900. Creator: Unknown

Balloon Map Illustrating the Battle of Pieters and Relief of Ladysmith, 1900. Creator: Unknown
Balloon Map Illustrating the Battle of Pieters and Relief of Ladysmith, 1900. From " South Africa and the Transvaal War, Vol. IV", by Louis Creswicke. [T. C. & E. C. Jack, Edinburgh, 1900]

Background imageStrategic Collection: The Blockhouse System, 1902. Creator: Unknown

The Blockhouse System, 1902. Creator: Unknown
The Blockhouse System, 1902. During the Second Boer War, British forces built a large number of fortifications in South Africa which played a vital role in the protection of the railway lines

Background imageStrategic Collection: Plan of Ladysmith and Chronicle of Events, 1900. Creators: Unknown, William T Maud

Plan of Ladysmith and Chronicle of Events, 1900. Creators: Unknown, William T Maud
Plan of Ladysmith and Chronicle of Events, 1900. The Siege of Ladysmith in the Second Boer War, took place between 2 November 1899 and 28 February 1900 From " South Africa and the Transvaal War

Background imageStrategic Collection: Bird s-Eye View of the Country Covered by General Bullers Operations for the Relief

Bird s-Eye View of the Country Covered by General Bullers Operations for the Relief of Ladysmith, 1900. When the Second Boer War broke out on 11 October 1899, the Boers laid siege to Ladysmith

Background imageStrategic Collection: Fighting Mac and the Highland Brigade in Action at Koodoesberg, 1900

Fighting Mac and the Highland Brigade in Action at Koodoesberg, 1900
" Fighting Mac" and the Highland Brigade in Action at Koodoesberg, 1900. General MacDonald took a position at Koodoesberg drift on the Modder River

Background imageStrategic Collection: Movements of Gatacre and French, 1900. Creator: Unknown

Movements of Gatacre and French, 1900. Creator: Unknown
Movements of Gatacre and French, 1900. William Forbes Gatacre commanded the British Army at the Battle of Omdurman and the 3rd Division during the first months of the Second Boer War

Background imageStrategic Collection: Colonel Pilchers Attack on Sunnyside Kopje, 1900. Creator: HC Seppings Wright

Colonel Pilchers Attack on Sunnyside Kopje, 1900. Creator: HC Seppings Wright
Colonel Pilchers Attack on Sunnyside Kopje-Canadian and Australian Contingents Receive Their " Baptism of Fire". 1900

Background imageStrategic Collection: Sketch and Plan of the Battle of Spion Kop, 1900. Creator: Unknown

Sketch and Plan of the Battle of Spion Kop, 1900. Creator: Unknown
Sketch and Plan of the Battle of Spion Kop, 1900. The Battle of Spion Kop was fought on the hilltop of Spioenkop in Natal in South Africa from 23-24 January 1900

Background imageStrategic Collection: Plan of battle of Elandslaagte, 1900. Creator: Unknown

Plan of battle of Elandslaagte, 1900. Creator: Unknown
Plan of battle of Elandslaagte, 1900. From " South Africa and the Transvaal War, Vol. II", by Louis Creswicke. [T. C. & E. C. Jack, Edinburgh, 1900]

Background imageStrategic Collection: Tree from which Captain Paget... Saw... San Juan Battle, Spanish-American War, June 1898, (1899)

Tree from which Captain Paget... Saw... San Juan Battle, Spanish-American War, June 1898, (1899)
Tree from which Captain Paget...Saw...San Juan Battle, Spanish-American War, June 1898, (1899). Tree from which Captain Paget and Other Foreigners as well as Several Correspondents

Background imageStrategic Collection: General Lawton Learning from Cuban Officers... June 30th, Spanish-American War, 1898, (1899)

General Lawton Learning from Cuban Officers... June 30th, Spanish-American War, 1898, (1899)
General Lawton Learning from Cuban Officers...June 30th, Spanish-American War, 1898, (1899). General Lawton Learning from Cuban Officers How El Caney Could (Not)

Background imageStrategic Collection: Napoleons bivouac on the battlefield of Wagram during the night of 5-6 July 1809, (1921)

Napoleons bivouac on the battlefield of Wagram during the night of 5-6 July 1809, (1921). Napoleon la veille de Wagram. Napoleon Bonaparte (1769-1821), silhouetted against the campfire

Background imageStrategic Collection: British officers on the Western Front, First World War, 1914-1918, (c1920). Creator: M Ugo

British officers on the Western Front, First World War, 1914-1918, (c1920). Creator: M Ugo
British officers on the Western Front, First World War, 1914-1918, (c1920). Directing an Attack on the British Front: scene at a brigade head-quarters

Background imageStrategic Collection: General Nikolai Yudenich, First World War, 1914-1918, (c1920). Creator: Unknown

General Nikolai Yudenich, First World War, 1914-1918, (c1920). Creator: Unknown
General Nikolai Yudenich, First World War, 1914-1918, (c1920). The Grand Dukes Master Strategist: General Judenich, who planned the Russian campaigns in Asia Minor, Persia, and Mesopotamia

Background imageStrategic Collection: The Theatre of War on the Western Front, (c1920). Creator: Unknown

The Theatre of War on the Western Front, (c1920). Creator: Unknown
The Theatre of War on the Western Front, (c1920). Map Showing the Main Battle Lines from September 1914 to November 1918. Northern France and Belgium during the First World War: also shown are: 1

Background imageStrategic Collection: Map of Two and a Half Years Campaign in Mesopotamia, 1917. Creator: Unknown

Map of Two and a Half Years Campaign in Mesopotamia, 1917. Creator: Unknown
Map of Two and a Half Years Campaign in Mesopotamia, 1917. From " The War Illustrated Album De Luxe - Volume VIII. Ending The First Three Years", edited by J. A. Hammerton

Background imageStrategic Collection: Map Showing the Relation of Serbia to Neighbouring States, 1916. Creator: Unknown

Map Showing the Relation of Serbia to Neighbouring States, 1916. Creator: Unknown
Map Showing the Relation of Serbia to Neighbouring States, 1916. The Serbian campaign was fought from late July 1914, when Austria-Hungary invaded Serbia at the outset of World War I

Background imageStrategic Collection: Detailed Map of the Arras Fighting Area, 1917. Creator: Unknown

Detailed Map of the Arras Fighting Area, 1917. Creator: Unknown
Detailed Map of the Arras Fighting Area, 1917. From " The War Illustrated Album De Luxe - Volume VIII. Ending The First Three Years", edited by J. A. Hammerton

Background imageStrategic Collection: Detailed Map of Gallipoli and Dardanelles, 1916. Creator: Unknown

Detailed Map of Gallipoli and Dardanelles, 1916. Creator: Unknown
Detailed Map of Gallipoli and Dardanelles, 1916. The Gallipoli campaign took place on the Gallipoli peninsula from 17 February 1915 to 9 January 1916

Background imageStrategic Collection: Guarding Britains Food Supplies, 1915. Creator: Unknown

Guarding Britains Food Supplies, 1915. Creator: Unknown
Guarding Britains Food Supplies, 1915. From " The War Illustrated Album De Luxe - Volume I. The First Phase", edited by J. A. Hammerton. [The Amalgamated Press, Limited, London, 1915]

Background imageStrategic Collection: The Campaign in German East Africa, 1917. Creator: Unknown

The Campaign in German East Africa, 1917. Creator: Unknown
The Campaign in German East Africa, 1917. From " The War Illustrated Album De Luxe - Volume VIII. Ending The First Three Years", edited by J. A. Hammerton

Background imageStrategic Collection: The War Map of Western Europe, 1915. Creator: Unknown

The War Map of Western Europe, 1915. Creator: Unknown
The War Map of Western Europe, 1915. Following the outbreak of war in August 1914, the German Army opened the Western Front by invading Luxembourg and Belgium

Background imageStrategic Collection: Map of Poland Showing Position of Conflicting Nations on July 24th, 1915, 1916. Creator: Unknown

Map of Poland Showing Position of Conflicting Nations on July 24th, 1915, 1916. Creator: Unknown
Map of Poland Showing Position of Conflicting Nations on July 24th, 1915, 1916. Because of its geographical position between fighting powers

Background imageStrategic Collection: The Great Arras Battle Area, 1917. Creator: Unknown

The Great Arras Battle Area, 1917. Creator: Unknown
The Great Arras Battle Area, 1917. From " The War Illustrated Album De Luxe - Volume VIII. Ending The First Three Years", edited by J. A. Hammerton

Background imageStrategic Collection: The Emperor of Russia with the Grand Duke Nicholas at the Front, 1916. Creator: Unknown

The Emperor of Russia with the Grand Duke Nicholas at the Front, 1916. Creator: Unknown
The Emperor of Russia with the Grand Duke Nicholas at the Front, 1916. Tsar Nicholas II of Russia with Grand Duke Nicholas Nikolaevich, a Russian general in World War One

Background imageStrategic Collection: Map Showing German Retreat in the West, 1917, 1917. Creator: Unknown

Map Showing German Retreat in the West, 1917, 1917. Creator: Unknown
Map Showing German Retreat in the West, 1917, 1917. From " The War Illustrated Album De Luxe - Volume VIII. Ending The First Three Years", edited by J. A. Hammerton

Background imageStrategic Collection: Famous French Leaders: General Joffre, General D Urbal, and General Foch. 1916

Famous French Leaders: General Joffre, General D Urbal, and General Foch. 1916. Joseph Joffre, Commander-in-Chief on the Western Front with officer Victor d Urbal

Background imageStrategic Collection: First Positions of the Two Million Troops of the Warring Nations, 1915. Creator: Unknown

First Positions of the Two Million Troops of the Warring Nations, 1915. Creator: Unknown
First Positions of the Two Million Troops of the Warring Nations, 1915. From " The War Illustrated Album De Luxe - Volume I. The First Phase", edited by J. A. Hammerton

Background imageStrategic Collection: The New Territory which General Botha added to the Empire, 1916. Creator: Unknown

The New Territory which General Botha added to the Empire, 1916. Creator: Unknown
The New Territory which General Botha added to the Empire, 1916. General Botha declared the Transvaal to the British Empire and represented the Boers in peace negotiations

Background imageStrategic Collection: The Hour of Fate on the Tigris, 1916. Creator: Unknown

The Hour of Fate on the Tigris, 1916. Creator: Unknown
The Hour of Fate on the Tigris, 1916. The Mesopotamian campaign on the Middle Eastern front was fought between the Allies and the Central Powers of the Ottoman Empire

Background imageStrategic Collection: The Battle-Fronts in the Opening Stages of the Fight for Verdun, 1916. Creator: Unknown

The Battle-Fronts in the Opening Stages of the Fight for Verdun, 1916. Creator: Unknown
The Battle-Fronts in the Opening Stages of the Fight for Verdun, 1916. The Battle of Verdun was fought from 21 February to 18 December 1916 on the Western Front

Background imageStrategic Collection: Map Indicating the Area of the Rumanian Campaign, 1917. Creator: Unknown

Map Indicating the Area of the Rumanian Campaign, 1917. Creator: Unknown
Map Indicating the Area of the Rumanian Campaign, 1917. From " The War Illustrated Album De Luxe - Volume VII. The Autumn Campaign of 1916", edited by J. A. Hammerton

Background imageStrategic Collection: Relief Map of Gorizia and the Carso Plateau, 1917. Creator: Unknown

Relief Map of Gorizia and the Carso Plateau, 1917. Creator: Unknown
Relief Map of Gorizia and the Carso Plateau, 1917. General Cadornas forces took the fighting north of Gorizia on the volcanic Carso plateau which had been fortified by the Austrians

Background imageStrategic Collection: Map Showing the Great British Advance of July 1916, 1916. Creator: Unknown

Map Showing the Great British Advance of July 1916, 1916. Creator: Unknown
Map Showing the Great British Advance of July 1916, 1916. From " The War Illustrated Album De Luxe - Volume VI. Allied operations during the Battle of the Somme

Background imageStrategic Collection: The Hour Has Struck. British First Line of Attack in the Great Push, 1917

The Hour Has Struck. British First Line of Attack in the Great Push, 1917
The Hour Has Struck. British First Line of Attack in the " Great Push", 1917. The Battle of the Somme began on 1st July 1916, with General Douglas Haigs offensive known as the Great Push


All Professionally Made to Order for Quick Shipping

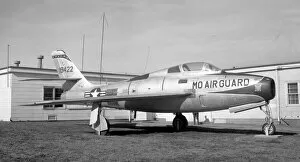
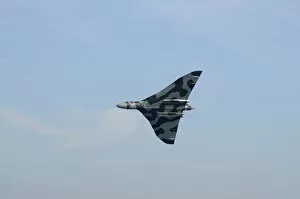
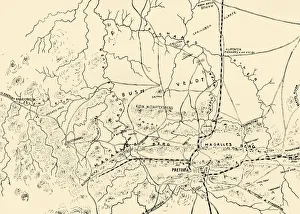
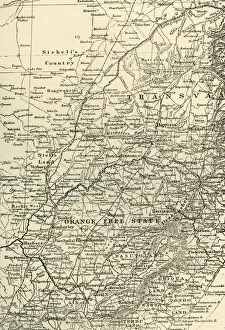
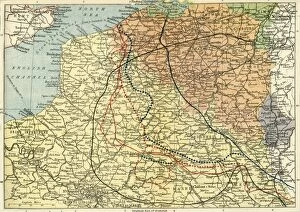
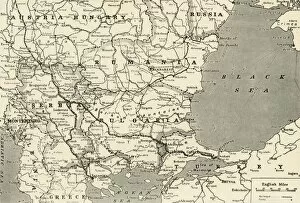
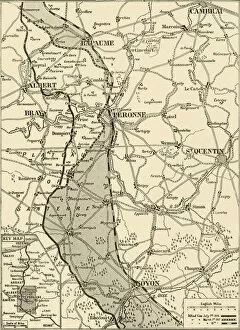
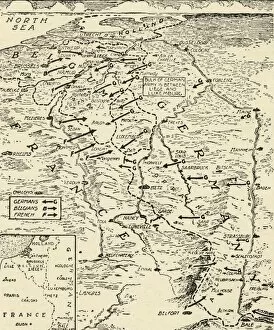
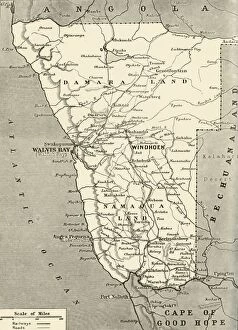
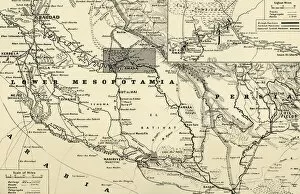
"Unleashing the Power of Strategy: Aerial Forces in Action" In this captivating snapshot, four Royal Australian Air Force F-111 aircraft soar through the sky with precision and purpose. Their strategic maneuvers echo the importance of careful planning and execution. Accompanying them are U. S. Air Force C-17 Globemasters, showcasing their immense capabilities as they gracefully navigate through the clouds. Together, these forces epitomize strategic collaboration on a global scale. A lone Royal Australian Air Force F-111 takes flight against a backdrop between Berlin and Rome, symbolizing the vast distances covered by aerial operations in pursuit objectives. The awe-inspiring presence of a B-2 Spirit soaring high above reminds us of its unparalleled stealth capabilities - an embodiment of strategy at its finest. Delving into history, we witness the Republic XF-12 Rainbow RC-2 taking center stage. This iconic aircraft represents an era where strategic innovation pushed boundaries to new heights. Maps become our guiding compasses as we explore G. H. Davis's depiction of war in North Africa - highlighting how geography played a pivotal role in shaping military strategies during crucial conflicts. Continuing our journey across Europe, another map by G. H. Davis showcases Sicily's significance as a strategically vital location throughout history – reminding us that every inch holds untold stories waiting to be discovered. Amidst all this action-packed imagery, a C-17 Globemaster III releases flares over the Atlantic Ocean - not only demonstrating tactical prowess but also emphasizing the importance of defensive measures for successful missions. Taking us back to World War II is an image capturing LCC-LFB emergency dam unit and trailer pump; it serves as a poignant reminder that even amidst chaos, strategists find ways to mitigate disaster and protect lives at all costs. Finally, G. H. Davis enlightens us about Crete and Cyprus' strategic importance – two Mediterranean gems whose geographical positioning has shaped the course of history.