Fraud Blocker Skip to main content

Scots Collection (page 8)

"Scotland for Ever: A Glimpse into the Proud Legacy of Scots" "Scotland for Ever

Background imageScots Collection: Scotland: Lerwick from Town Hall (b/w photo)

Scotland: Lerwick from Town Hall (b/w photo)
8654984 Scotland: Lerwick from Town Hall (b/w photo) by English Photographer, (20th century); Private Collection; (add.info.: Lerwick from Town Hall)

Background imageScots Collection: Scotland: Coats Memorial Church, Paisley (b/w photo)

Scotland: Coats Memorial Church, Paisley (b/w photo)
8654980 Scotland: Coats Memorial Church, Paisley (b/w photo) by English Photographer, (20th century); Private Collection; (add.info.: Coats Memorial Church, Paisley)

Background imageScots Collection: Scotland: Millport, from the East (b/w photo)

Scotland: Millport, from the East (b/w photo)
8654979 Scotland: Millport, from the East (b/w photo) by English Photographer, (20th century); Private Collection; (add.info.: Millport, from the East)

Background imageScots Collection: Scotland: John Knox's House, Edinburgh (b/w photo)

Scotland: John Knox's House, Edinburgh (b/w photo)
8654969 Scotland: John Knox's House, Edinburgh (b/w photo) by English Photographer, (20th century); Private Collection; (add.info.: John Knox's House, Edinburgh)

Background imageScots Collection: Scotland: The Rock and Spindle, St Andrews (b/w photo)

Scotland: The Rock and Spindle, St Andrews (b/w photo)
8654963 Scotland: The Rock and Spindle, St Andrews (b/w photo) by English Photographer, (20th century); Private Collection; (add.info.: The Rock and Spindle, St Andrews)

Background imageScots Collection: Scotland: Loch Tay and Killin (b/w photo)

Scotland: Loch Tay and Killin (b/w photo)
8654959 Scotland: Loch Tay and Killin (b/w photo) by English Photographer, (20th century); Private Collection; (add.info.: Loch Tay and Killin)

Background imageScots Collection: Scotland: Loch Eck (b/w photo)

Scotland: Loch Eck (b/w photo)
8654958 Scotland: Loch Eck (b/w photo) by English Photographer, (20th century); Private Collection; (add.info.: Loch Eck. Illustration for Bonnie Scotland, Portfolio of Scottish Scenery (John Leng)

Background imageScots Collection: Scotland: Girvan and New Bridge (b/w photo)

Scotland: Girvan and New Bridge (b/w photo)
8654944 Scotland: Girvan and New Bridge (b/w photo) by English Photographer, (20th century); Private Collection; (add.info.: Girvan and New Bridge)

Background imageScots Collection: Scotland: Bannockburn from Gillies Hill (b/w photo)

Scotland: Bannockburn from Gillies Hill (b/w photo)
8654937 Scotland: Bannockburn from Gillies Hill (b/w photo) by English Photographer, (20th century); Private Collection; (add.info.: Bannockburn from Gillies Hill)

Background imageScots Collection: Scotland: Trossachs Pier and Steamer (b/w photo)

Scotland: Trossachs Pier and Steamer (b/w photo)
8654936 Scotland: Trossachs Pier and Steamer (b/w photo) by English Photographer, (20th century); Private Collection; (add.info.: Trossachs Pier and Steamer)

Background imageScots Collection: Scotland: Stranraer (b/w photo)

Scotland: Stranraer (b/w photo)
8654930 Scotland: Stranraer (b/w photo) by English Photographer, (20th century); Private Collection; (add.info.: Stranraer)

Background imageScots Collection: Scotland: Drummond Castle (b/w photo)

Scotland: Drummond Castle (b/w photo)
8654929 Scotland: Drummond Castle (b/w photo) by English Photographer, (20th century); Private Collection; (add.info.: Drummond Castle)

Background imageScots Collection: Scotland: Hamilton Palace (b/w photo)

Scotland: Hamilton Palace (b/w photo)
8654928 Scotland: Hamilton Palace (b/w photo) by English Photographer, (20th century); Private Collection; (add.info.: Hamilton Palace)

Background imageScots Collection: Scotland: Stitchell Linn, Kelso (b/w photo)

Scotland: Stitchell Linn, Kelso (b/w photo)
8654923 Scotland: Stitchell Linn, Kelso (b/w photo) by English Photographer, (20th century); Private Collection; (add.info.: Stitchell Linn, Kelso)

Background imageScots Collection: Scotland: Lochee (b/w photo)

Scotland: Lochee (b/w photo)
8654921 Scotland: Lochee (b/w photo) by English Photographer, (20th century); Private Collection; (add.info.: Lochee. Illustration for Bonnie Scotland, Portfolio of Scottish Scenery (John Leng)

Background imageScots Collection: Scotland: Falkland Palace (b/w photo)

Scotland: Falkland Palace (b/w photo)
8654918 Scotland: Falkland Palace (b/w photo) by English Photographer, (20th century); Private Collection; (add.info.: Falkland Palace)

Background imageScots Collection: Scotland: Balmoral (b/w photo)

Scotland: Balmoral (b/w photo)
8654916 Scotland: Balmoral (b/w photo) by English Photographer, (20th century); Private Collection; (add.info.: Balmoral. Illustration for Bonnie Scotland, Portfolio of Scottish Scenery (John Leng)

Background imageScots Collection: Scotland: Old Machar Cathedral, Aberdeen (b/w photo)

Scotland: Old Machar Cathedral, Aberdeen (b/w photo)
8654915 Scotland: Old Machar Cathedral, Aberdeen (b/w photo) by English Photographer, (20th century); Private Collection; (add.info.: Old Machar Cathedral, Aberdeen)

Background imageScots Collection: Scotland: The Square, Beauly (b/w photo)

Scotland: The Square, Beauly (b/w photo)
8654912 Scotland: The Square, Beauly (b/w photo) by English Photographer, (20th century); Private Collection; (add.info.: The Square, Beauly)

Background imageScots Collection: Scotland: Portknockie Harbour (b/w photo)

Scotland: Portknockie Harbour (b/w photo)
8654906 Scotland: Portknockie Harbour (b/w photo) by English Photographer, (20th century); Private Collection; (add.info.: Portknockie Harbour)

Background imageScots Collection: Scotland: Bothwell Bridge and Monument (b/w photo)

Scotland: Bothwell Bridge and Monument (b/w photo)
8654900 Scotland: Bothwell Bridge and Monument (b/w photo) by English Photographer, (20th century); Private Collection; (add.info.: Bothwell Bridge and Monument)

Background imageScots Collection: Scotland: The Pass of Glencoe, from 'The Study' (b/w photo)

Scotland: The Pass of Glencoe, from "The Study" (b/w photo)
8654883 Scotland: The Pass of Glencoe, from "The Study" (b/w photo) by English Photographer, (20th century); Private Collection; (add.info.: The Pass of Glencoe, from "The Study")

Background imageScots Collection: Scotland: Abbey Church, Haddington (b/w photo)

Scotland: Abbey Church, Haddington (b/w photo)
8654881 Scotland: Abbey Church, Haddington (b/w photo) by English Photographer, (20th century); Private Collection; (add.info.: Abbey Church, Haddington)

Background imageScots Collection: Scotland: New Stone Bridge, Musselburgh (b/w photo)

Scotland: New Stone Bridge, Musselburgh (b/w photo)
8654879 Scotland: New Stone Bridge, Musselburgh (b/w photo) by English Photographer, (20th century); Private Collection; (add.info.: New Stone Bridge, Musselburgh)

Background imageScots Collection: Scotland: High Street and Town Hall, Lauder (b/w photo)

Scotland: High Street and Town Hall, Lauder (b/w photo)
8654877 Scotland: High Street and Town Hall, Lauder (b/w photo) by English Photographer, (20th century); Private Collection; (add.info.: High Street and Town Hall, Lauder)

Background imageScots Collection: Scotland: Lockerbie from Mains Hill (b/w photo)

Scotland: Lockerbie from Mains Hill (b/w photo)
8654876 Scotland: Lockerbie from Mains Hill (b/w photo) by English Photographer, (20th century); Private Collection; (add.info.: Lockerbie from Mains Hill)

Background imageScots Collection: Scotland: Kirkcudbright from North (b/w photo)

Scotland: Kirkcudbright from North (b/w photo)
8654875 Scotland: Kirkcudbright from North (b/w photo) by English Photographer, (20th century); Private Collection; (add.info.: Kirkcudbright from North)

Background imageScots Collection: Scotland: Interior of Roslin Chapel (b/w photo)

Scotland: Interior of Roslin Chapel (b/w photo)
8654871 Scotland: Interior of Roslin Chapel (b/w photo) by English Photographer, (20th century); Private Collection; (add.info.: Interior of Roslin Chapel)

Background imageScots Collection: Scotland: Auchtermuchty from Newburgh Road (b/w photo)

Scotland: Auchtermuchty from Newburgh Road (b/w photo)
8654867 Scotland: Auchtermuchty from Newburgh Road (b/w photo) by English Photographer, (20th century); Private Collection; (add.info.: Auchtermuchty from Newburgh Road)

Background imageScots Collection: Scotland: Maeshowe, Kirkwall (b/w photo)

Scotland: Maeshowe, Kirkwall (b/w photo)
8654865 Scotland: Maeshowe, Kirkwall (b/w photo) by English Photographer, (20th century); Private Collection; (add.info.: Maeshowe, Kirkwall)

Background imageScots Collection: Scotland: Storm Warning, Dunbar (b/w photo)

Scotland: Storm Warning, Dunbar (b/w photo)
8654863 Scotland: Storm Warning, Dunbar (b/w photo) by English Photographer, (20th century); Private Collection; (add.info.: Storm Warning, Dunbar)

Background imageScots Collection: Scotland: Albert Institute, Dundee (b/w photo)

Scotland: Albert Institute, Dundee (b/w photo)
8654844 Scotland: Albert Institute, Dundee (b/w photo) by English Photographer, (20th century); Private Collection; (add.info.: Albert Institute, Dundee)

Background imageScots Collection: Scotland: East Bay, Helensburgh (b/w photo)

Scotland: East Bay, Helensburgh (b/w photo)
8654843 Scotland: East Bay, Helensburgh (b/w photo) by English Photographer, (20th century); Private Collection; (add.info.: East Bay, Helensburgh)

Background imageScots Collection: Scotland: Luss Straits, Loch Lomond (b/w photo)

Scotland: Luss Straits, Loch Lomond (b/w photo)
8654838 Scotland: Luss Straits, Loch Lomond (b/w photo) by English Photographer, (20th century); Private Collection; (add.info.: Luss Straits, Loch Lomond)

Background imageScots Collection: Scotland: Dumbarton Castle and Pier (b/w photo)

Scotland: Dumbarton Castle and Pier (b/w photo)
8654824 Scotland: Dumbarton Castle and Pier (b/w photo) by English Photographer, (20th century); Private Collection; (add.info.: Dumbarton Castle and Pier)

Background imageScots Collection: Scotland: At Blairgowrie (b/w photo)

Scotland: At Blairgowrie (b/w photo)
8654820 Scotland: At Blairgowrie (b/w photo) by English Photographer, (20th century); Private Collection; (add.info.: At Blairgowrie)

Background imageScots Collection: Scotland: Alyth from South (b/w photo)

Scotland: Alyth from South (b/w photo)
8654817 Scotland: Alyth from South (b/w photo) by English Photographer, (20th century); Private Collection; (add.info.: Alyth from South)

Background imageScots Collection: Scotland: Innerleithen from West (b/w photo)

Scotland: Innerleithen from West (b/w photo)
8654814 Scotland: Innerleithen from West (b/w photo) by English Photographer, (20th century); Private Collection; (add.info.: Innerleithen from West)

Background imageScots Collection: Scotland: Carsaig Arches, Island of Mull (b/w photo)

Scotland: Carsaig Arches, Island of Mull (b/w photo)
8654792 Scotland: Carsaig Arches, Island of Mull (b/w photo) by English Photographer, (20th century); Private Collection; (add.info.: Carsaig Arches, Island of Mull)

Background imageScots Collection: Scotland: Loch Lomond and Ben Lomond (b/w photo)

Scotland: Loch Lomond and Ben Lomond (b/w photo)
8654790 Scotland: Loch Lomond and Ben Lomond (b/w photo) by English Photographer, (20th century); Private Collection; (add.info.: Loch Lomond and Ben Lomond)

Background imageScots Collection: Scotland: Coldstream Bridge (b/w photo)

Scotland: Coldstream Bridge (b/w photo)
8654783 Scotland: Coldstream Bridge (b/w photo) by English Photographer, (20th century); Private Collection; (add.info.: Coldstream Bridge)

Background imageScots Collection: Scotland: Arrochar from the North-East (b/w photo)

Scotland: Arrochar from the North-East (b/w photo)
8654779 Scotland: Arrochar from the North-East (b/w photo) by English Photographer, (20th century); Private Collection; (add.info.: Arrochar from the North-East)

Background imageScots Collection: Scotland: Town Hall and Market Square, Duns (b/w photo)

Scotland: Town Hall and Market Square, Duns (b/w photo)
8654773 Scotland: Town Hall and Market Square, Duns (b/w photo) by English Photographer, (20th century); Private Collection; (add.info.: Town Hall and Market Square, Duns)

Background imageScots Collection: Scotland: Norman Church, Leuchars (b/w photo)

Scotland: Norman Church, Leuchars (b/w photo)
8654769 Scotland: Norman Church, Leuchars (b/w photo) by English Photographer, (20th century); Private Collection; (add.info.: Norman Church, Leuchars)

Background imageScots Collection: Scottish National War Memorial: The Canadian Scottish (b/w photo)

Scottish National War Memorial: The Canadian Scottish (b/w photo)
8648381 Scottish National War Memorial: The Canadian Scottish (b/w photo) by English Photographer, (20th century); Private Collection; (add.info.: The Canadian Scottish)

Background imageScots Collection: Scottish National War Memorial: The Royal Scots Greys (b/w photo)

Scottish National War Memorial: The Royal Scots Greys (b/w photo)
8648375 Scottish National War Memorial: The Royal Scots Greys (b/w photo) by English Photographer, (20th century); Private Collection; (add.info.: The Royal Scots Greys)

Background imageScots Collection: Scottish National War Memorial: The Royal Navy (b/w photo)

Scottish National War Memorial: The Royal Navy (b/w photo)
8648373 Scottish National War Memorial: The Royal Navy (b/w photo) by English Photographer, (20th century); Private Collection; (add.info.: The Royal Navy)

Background imageScots Collection: Scottish National War Memorial: The Queen's Own Cameron Highlanders (b/w photo)

Scottish National War Memorial: The Queen's Own Cameron Highlanders (b/w photo)
8648363 Scottish National War Memorial: The Queen's Own Cameron Highlanders (b/w photo) by English Photographer, (20th century); Private Collection; (add.info)


All Professionally Made to Order for Quick Shipping

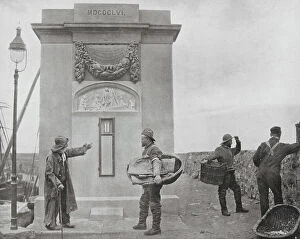
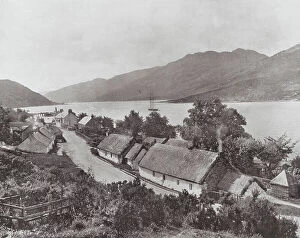
"Scotland for Ever: A Glimpse into the Proud Legacy of Scots" "Scotland for Ever. The charge of the Scots Greys at Waterloo, 18 June 1815" Step back in time and witness the heroic charge of the Scots Greys, a moment that forever etched Scotland's bravery onto history's canvas. "British Military Poster - Inter-war period: Celebrating Scottish Valor" During an era marked by uncertainty, this poster pays homage to the indomitable spirit and unwavering loyalty of Scottish soldiers. "Mary, Queen of Scots: A Tale of Power and Tragedy" Explore the captivating life story of Mary Stuart, whose reign continues to captivate hearts with its blend of ambition, love, and tragedy. "Scotland Forever. The Charge of the Scots Greys at Waterloo" Relive one of Scotland's proudest moments as we delve into the legendary charge that saw brave Scottish warriors leave an indelible mark on history. "Scots Greys Charge at the Battle of Waterloo: Courage Unleashed" Discover how these fearless warriors fearlessly charged into battle during one fateful day in 1815, shaping not only their own destiny but also that of Europe. "Badges of Scottish Regiments - World War One: Symbols That Inspire Bravery" Uncover a visual tapestry showcasing symbols representing valorous regiments from Scotland who stood united against adversity during World War One. "Street Scene in St Kilda: Embracing Tradition Amidst Breathtaking Beauty" Immerse yourself in a picturesque street scene set amidst St Kilda's stunning landscapes—a testament to Scotland's unique charm and enduring heritage. "Kings Own Scottish Borderers: Guardians Defending Our Borders With Honor" Learn about this esteemed regiment whose unwavering dedication protected our borders throughout history while embodying the true spirit of Scotland.