Fraud Blocker Skip to main content

Jameson Raid Collection

The Jameson Raid: A Tale of Ambition, Betrayal, and Defeat In the dimly lit room at Bow Street

Background imageJameson Raid Collection: Dr Jameson and his Officers at Bow Street, Tuesday Evening, 25 February (litho)

Dr Jameson and his Officers at Bow Street, Tuesday Evening, 25 February (litho)
1605540 Dr Jameson and his Officers at Bow Street, Tuesday Evening, 25 February (litho) by Begg, Samuel (fl.1886-1916) (after); Private Collection; (add.info)

Background imageJameson Raid Collection: State Artillery coming up by Rail (litho)

State Artillery coming up by Rail (litho)
1605489 State Artillery coming up by Rail (litho) by Begg, Samuel (fl.1886-1916) (after); Private Collection; (add.info.: State Artillery coming up by Rail)

Background imageJameson Raid Collection: The Parliamentary Inquiry on the Jameson Raid, Mr Cecil Rhodes giving Evidence before the South

The Parliamentary Inquiry on the Jameson Raid, Mr Cecil Rhodes giving Evidence before the South Africa Committee (litho)
1597198 The Parliamentary Inquiry on the Jameson Raid, Mr Cecil Rhodes giving Evidence before the South Africa Committee (litho) by Begg

Background imageJameson Raid Collection: Dr Jameson in Prison at Pretoria (engraving)

Dr Jameson in Prison at Pretoria (engraving)
1605493 Dr Jameson in Prison at Pretoria (engraving) by Forestier, Amedee (1854-1930) (after); Private Collection; (add.info.: Dr Jameson in Prison at Pretoria)

Background imageJameson Raid Collection: The Battle-Field at Doornkop viewed from the Boers Side (litho)

The Battle-Field at Doornkop viewed from the Boers Side (litho)
1605483 The Battle-Field at Doornkop viewed from the Boers Side (litho) by Loye, Charles Auguste (Montbard) (1841-1905); Private Collection; (add.info)

Background imageJameson Raid Collection: Kaffirs, holding Spare Horses, witnessing the Battle from Afar (litho)

Kaffirs, holding Spare Horses, witnessing the Battle from Afar (litho)
1605471 Kaffirs, holding Spare Horses, witnessing the Battle from Afar (litho) by Wollen, William Barnes (1857-1936) (after); Private Collection; (add.info.: Kaffirs, holding Spare Horses)

Background imageJameson Raid Collection: The Trouble in the Transvaal, Leaders of the Reform Committee escorted to Jail after Examination

The Trouble in the Transvaal, Leaders of the Reform Committee escorted to Jail after Examination at the Government
1605144 The Trouble in the Transvaal, Leaders of the Reform Committee escorted to Jail after Examination at the Government Buildings, Pretoria (litho) by Forestier

Background imageJameson Raid Collection: The Trouble in the Transvaal, Dr Jameson and his Men being escorted as Prisoners after the Battle

The Trouble in the Transvaal, Dr Jameson and his Men being escorted as Prisoners after the Battle of Doornkop (litho)
1605543 The Trouble in the Transvaal, Dr Jameson and his Men being escorted as Prisoners after the Battle of Doornkop (litho) by Wollen

Background imageJameson Raid Collection: The Grand Hotel, Pretoria, Scene on the Arrival of the Arrested Members of the Reform Committee

The Grand Hotel, Pretoria, Scene on the Arrival of the Arrested Members of the Reform Committee (engraving)
1605495 The Grand Hotel, Pretoria, Scene on the Arrival of the Arrested Members of the Reform Committee (engraving) by Holland Tringham

Background imageJameson Raid Collection: Messenger with News of Dr Jamesons Defeat resting at Chapmans Store on the Road to Johannesburg

Messenger with News of Dr Jamesons Defeat resting at Chapmans Store on the Road to Johannesburg (litho)
1605488 Messenger with News of Dr Jamesons Defeat resting at Chapmans Store on the Road to Johannesburg (litho) by Prior, Melton (1845-1910) (after); Private Collection; (add.info)

Background imageJameson Raid Collection: After the Surrender (litho)

After the Surrender (litho)
1605485 After the Surrender (litho) by Wollen, William Barnes (1857-1936) (after); Private Collection; (add.info.: After the Surrender. Illustration for The Illustrated London News, 25 February 1896)

Background imageJameson Raid Collection: The Surrender (litho)

The Surrender (litho)
1605484 The Surrender (litho) by Forestier, Amedee (1854-1930) (after); Private Collection; (add.info.: The Surrender. Illustration for The Illustrated London News, 25 February 1896)

Background imageJameson Raid Collection: Four of the Principal Men of the Johannesburg National Reform Union (b / w photo)

Four of the Principal Men of the Johannesburg National Reform Union (b / w photo)
1605475 Four of the Principal Men of the Johannesburg National Reform Union (b/w photo) by English Photographer, (19th century); Private Collection; (add.info)

Background imageJameson Raid Collection: The C Troop, Australian Contingent, Johannesburg (engraving)

The C Troop, Australian Contingent, Johannesburg (engraving)
1605470 The C Troop, Australian Contingent, Johannesburg (engraving) by English School, (19th century); Private Collection; (add.info.: The C Troop, Australian Contingent, Johannesburg)

Background imageJameson Raid Collection: Jameson calling for Volunteers (litho)

Jameson calling for Volunteers (litho)
1605458 Jameson calling for Volunteers (litho) by Wollen, William Barnes (1857-1936) (after); Private Collection; (add.info.: Jameson calling for Volunteers)

Background imageJameson Raid Collection: Our Special Artists in the Transvaal (engraving)

Our Special Artists in the Transvaal (engraving)
1605060 Our Special Artists in the Transvaal (engraving) by Prior, Melton (1845-1910) (after); Private Collection; (add.info.: Our Special Artists in the Transvaal)

Background imageJameson Raid Collection: The Jameson Raid. Leander Starr Jameson taken by the Boers to Pretoria after his capture

The Jameson Raid. Leander Starr Jameson taken by the Boers to Pretoria after his capture, 1896 (engraving)
6000486 The Jameson Raid. Leander Starr Jameson taken by the Boers to Pretoria after his capture, 1896 (engraving) by French School, (19th century); Private Collection; (add.info.: The Jameson Raid)

Background imageJameson Raid Collection: Scene outside the Landrosts Court-House on the Arrival of Stragglers of Jamesons Force (litho)

Scene outside the Landrosts Court-House on the Arrival of Stragglers of Jamesons Force (litho)
1605491 Scene outside the Landrosts Court-House on the Arrival of Stragglers of Jamesons Force (litho) by English School, (19th century); Private Collection; (add.info)

Background imageJameson Raid Collection: Casualties of the Battle of Doornkop (engraving)

Casualties of the Battle of Doornkop (engraving)
1605469 Casualties of the Battle of Doornkop (engraving) by English School, (19th century); Private Collection; (add.info.: Casualties of the Battle of Doornkop)

Background imageJameson Raid Collection: The Night Bivouac, the Boers continue firing upon the Camp during a Thunderstorm (litho)

The Night Bivouac, the Boers continue firing upon the Camp during a Thunderstorm (litho)
1605468 The Night Bivouac, the Boers continue firing upon the Camp during a Thunderstorm (litho) by Wollen, William Barnes (1857-1936) (after); Private Collection; (add.info.: The Night Bivouac)

Background imageJameson Raid Collection: The First Encounter with the Boers, Moonlight (litho)

The First Encounter with the Boers, Moonlight (litho)
1605467 The First Encounter with the Boers, Moonlight (litho) by Overend, William Heysham (1851-98) (after); Private Collection; (add.info.: The First Encounter with the Boers, Moonlight)

Background imageJameson Raid Collection: Three Prominent Members of the Johannesburg National Reform Union (b / w photo)

Three Prominent Members of the Johannesburg National Reform Union (b / w photo)
1605466 Three Prominent Members of the Johannesburg National Reform Union (b/w photo) by English Photographer, (19th century); Private Collection; (add.info)

Background imageJameson Raid Collection: Serving out Arms and Ammunition to Burghers and Registered Men in Pretoria (engraving)

Serving out Arms and Ammunition to Burghers and Registered Men in Pretoria (engraving)
1605456 Serving out Arms and Ammunition to Burghers and Registered Men in Pretoria (engraving) by English School, (19th century); Private Collection; (add.info)

Background imageJameson Raid Collection: The Charge of the Three Hundred at Doornkop (litho)

The Charge of the Three Hundred at Doornkop (litho)
1605521 The Charge of the Three Hundred at Doornkop (litho) by Overend, William Heysham (1851-98) (after); Private Collection; (add.info.: The Charge of the Three Hundred at Doornkop)

Background imageJameson Raid Collection: The Johannesburg Revolutionists in Pretoria Jail (litho)

The Johannesburg Revolutionists in Pretoria Jail (litho)
1605496 The Johannesburg Revolutionists in Pretoria Jail (litho) by Prior, Melton (1845-1910) (after); Private Collection; (add.info.: The Johannesburg Revolutionists in Pretoria Jail)

Background imageJameson Raid Collection: The Trouble in the Transvaal (engraving)

The Trouble in the Transvaal (engraving)
1605040 The Trouble in the Transvaal (engraving) by Prior, Melton (1845-1910) (after); Private Collection; (add.info.: The Trouble in the Transvaal)

Background imageJameson Raid Collection: Checkmate (colour litho)

Checkmate (colour litho)
964661 Checkmate (colour litho) by English School, (19th century); Private Collection; (add.info.: Checkmate. From Truth, 25 December 1896.); © Look and Learn

Background imageJameson Raid Collection: Outside the Jail at Pretoria immediately after the Arrival of Jameson and his Officers (litho)

Outside the Jail at Pretoria immediately after the Arrival of Jameson and his Officers (litho)
1605492 Outside the Jail at Pretoria immediately after the Arrival of Jameson and his Officers (litho) by Wollen, William Barnes (1857-1936) (after); Private Collection; (add.info)

Background imageJameson Raid Collection: Group of Officers at Pitsani Pothlugo, who were sent to tell Jameson to return (litho)

Group of Officers at Pitsani Pothlugo, who were sent to tell Jameson to return (litho)
1605478 Group of Officers at Pitsani Pothlugo, who were sent to tell Jameson to return (litho) by English School, (19th century); Private Collection; (add.info)

Background imageJameson Raid Collection: A Trooper bringing up a Maxim Gun after the Horses had been killed (litho)

A Trooper bringing up a Maxim Gun after the Horses had been killed (litho)
1605476 A Trooper bringing up a Maxim Gun after the Horses had been killed (litho) by Forestier, Amedee (1854-1930) (after); Private Collection; (add.info)

Background imageJameson Raid Collection: A Gun belonging to the Transvaal State Artillery at Pretoria (engraving)

A Gun belonging to the Transvaal State Artillery at Pretoria (engraving)
1605460 A Gun belonging to the Transvaal State Artillery at Pretoria (engraving) by English School, (19th century); Private Collection; (add.info)

Background imageJameson Raid Collection: Captain Frank Thatcher (b / w photo)

Captain Frank Thatcher (b / w photo)
1605457 Captain Frank Thatcher (b/w photo) by English Photographer, (19th century); Private Collection; (add.info.: Captain Frank Thatcher)

Background imageJameson Raid Collection: Dr Jameson and his Officers at Bow Street, Tuesday, 10 March

Dr Jameson and his Officers at Bow Street, Tuesday, 10 March, Sergeant Drummond Hay under Examination (litho)
1605146 Dr Jameson and his Officers at Bow Street, Tuesday, 10 March, Sergeant Drummond Hay under Examination (litho) by Wright

Background imageJameson Raid Collection: Our Special Artists in the Transvaal (engraving)

Our Special Artists in the Transvaal (engraving)
1605053 Our Special Artists in the Transvaal (engraving) by Prior, Melton (1845-1910) (after); Private Collection; (add.info.: Our Special Artists in the Transvaal)

Background imageJameson Raid Collection: The Jameson Raid (colour litho)

The Jameson Raid (colour litho)
2818710 The Jameson Raid (colour litho) by Meyer, Henri (1841-99) (after); Private Collection; (add.info.: The Jameson Raid. Leander Starr Jameson captured by the Boers in the Transvaal)

Background imageJameson Raid Collection: Dr Jameson at Bow Street, 'All the Gentlemen Present, Sir John'(engraving)

Dr Jameson at Bow Street, "All the Gentlemen Present, Sir John"(engraving)
1042123 Dr Jameson at Bow Street, " All the Gentlemen Present, Sir John" (engraving) by Hall, Sydney Prior (1842-1922) (after); Private Collection; (add.info.: Dr Jameson at Bow Street)

Background imageJameson Raid Collection: The Transvaal Crisis, Characteristic Scenes in the Republics (engraving)

The Transvaal Crisis, Characteristic Scenes in the Republics (engraving)
1592679 The Transvaal Crisis, Characteristic Scenes in the Republics (engraving) by Wright, Henry Charles Seppings (1850-1937); Private Collection; (add.info.: The Transvaal Crisis)

Background imageJameson Raid Collection: Dr Jameson and his Officers (engraving)

Dr Jameson and his Officers (engraving)
1605127 Dr Jameson and his Officers (engraving) by English School, (19th century); Private Collection; (add.info.: Dr Jameson and his Officers)

Background imageJameson Raid Collection: The Trouble in the Transvaal, Messenger with News of Dr Jamesons Defeat resting at Chapmans Store

The Trouble in the Transvaal, Messenger with News of Dr Jamesons Defeat resting at Chapmans Store on the Road to
1605042 The Trouble in the Transvaal, Messenger with News of Dr Jamesons Defeat resting at Chapmans Store on the Road to Johannesburg (engraving) by Prior

Background imageJameson Raid Collection: The Trouble in the Transvaal, the Boers bringing their Prisoners into Pretoria (litho)

The Trouble in the Transvaal, the Boers bringing their Prisoners into Pretoria (litho)
1605548 The Trouble in the Transvaal, the Boers bringing their Prisoners into Pretoria (litho) by Prior, Melton (1845-1910) (after); Private Collection; (add.info.: The Trouble in the Transvaal)

Background imageJameson Raid Collection: The Trouble in the Transvaal, the Battle of Doornkop, near Krugersdorp

The Trouble in the Transvaal, the Battle of Doornkop, near Krugersdorp, Dr Jamesons Last Stand (litho)
1605547 The Trouble in the Transvaal, the Battle of Doornkop, near Krugersdorp, Dr Jamesons Last Stand (litho) by Prior, Melton (1845-1910) (after); Private Collection; (add.info)

Background imageJameson Raid Collection: The Trouble in the Transvaal, the Preliminary Examination of the Johannesburg Reform Committee

The Trouble in the Transvaal, the Preliminary Examination of the Johannesburg Reform Committee (litho)
1605537 The Trouble in the Transvaal, the Preliminary Examination of the Johannesburg Reform Committee (litho) by Prior, Melton (1845-1910) (after); Private Collection; (add.info)

Background imageJameson Raid Collection: The Battle-Field as viewed Five Miles from Johannesburg (engraving)

The Battle-Field as viewed Five Miles from Johannesburg (engraving)
1605482 The Battle-Field as viewed Five Miles from Johannesburg (engraving) by Loye, Charles Auguste (Montbard) (1841-1905); Private Collection; (add.info)

Background imageJameson Raid Collection: A Crack Shot of Jamesons Troop killed by a Boer Bullet (litho)

A Crack Shot of Jamesons Troop killed by a Boer Bullet (litho)
1605472 A Crack Shot of Jamesons Troop killed by a Boer Bullet (litho) by Forestier, Amedee (1854-1930) (after); Private Collection; (add.info)

Background imageJameson Raid Collection: Jamesons Men cutting the Telegraph Wires (litho)

Jamesons Men cutting the Telegraph Wires (litho)
1605463 Jamesons Men cutting the Telegraph Wires (litho) by Forestier, Amedee (1854-1930) (after); Private Collection; (add.info.: Jamesons Men cutting the Telegraph Wires)

Background imageJameson Raid Collection: Jamesons Start (litho)

Jamesons Start (litho)
1605459 Jamesons Start (litho) by Overend, William Heysham (1851-98) (after); Private Collection; (add.info.: Jamesons Start. Illustration for The Illustrated London News, 25 February 1896)

Background imageJameson Raid Collection: In a fix! (colour litho)

In a fix! (colour litho)
2818714 In a fix! (colour litho) by Meyer, Henri (1841-99) (after); Private Collection; (add.info.: In a fix! Satire lampooning Britains difficulties over the Venezuelan crisis of 1895)

Background imageJameson Raid Collection: The Johannesburg Reform Committee (b / w photo)

The Johannesburg Reform Committee (b / w photo)
1605349 The Johannesburg Reform Committee (b/w photo) by English Photographer, (19th century); Private Collection; (add.info.: The Johannesburg Reform Committee)


All Professionally Made to Order for Quick Shipping

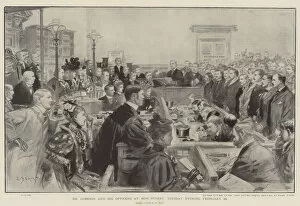
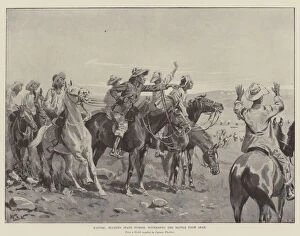
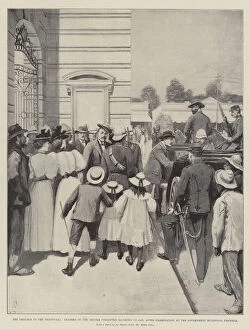
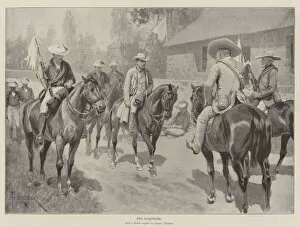
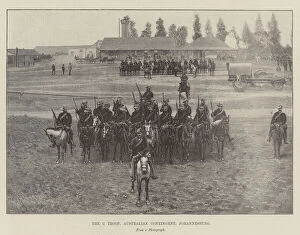
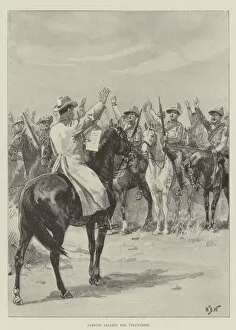
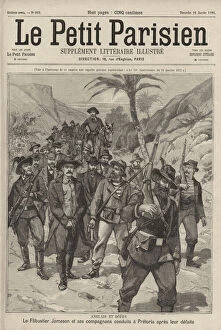
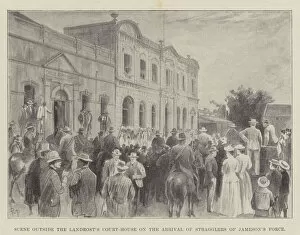
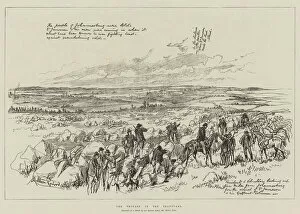
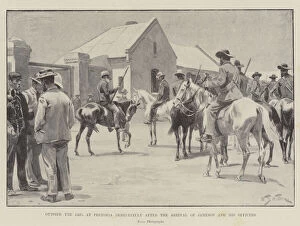
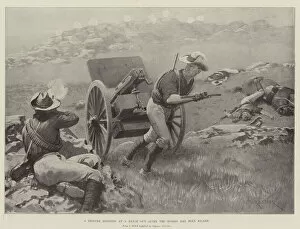
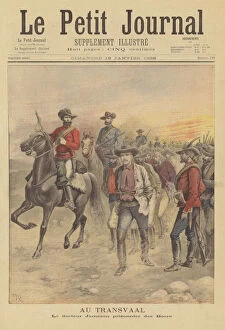
The Jameson Raid: A Tale of Ambition, Betrayal, and Defeat In the dimly lit room at Bow Street, Dr Jameson and his Officers gather on that fateful Tuesday evening of 25 February. Their faces etched with determination, they discuss their audacious plan to overthrow the Transvaal government. State Artillery rumbles along the rail tracks, a formidable force ready to support their cause. The clanking metal echoes through the air as they approach their destination - a symbol of power and rebellion. Amidst the chaos and uncertainty, Mr Cecil Rhodes takes center stage in front of the South Africa Committee during The Parliamentary Inquiry on the Jameson Raid. His voice resolute yet tinged with regret as he gives evidence about his involvement in this ill-fated venture. Meanwhile, Dr Jameson finds himself confined within prison walls in Pretoria. Alone with his thoughts, he reflects upon how his dreams of liberation have turned into a nightmare. Engraved lines etch deep into his face as he contemplates what went wrong. On the battlefields at Doornkop, viewed from afar by Kaffirs holding spare horses witnessing history unfold before them. Smoke billows from cannons while gunfire pierces through the air like thunderclaps - a testament to bravery and sacrifice on both sides. Leaders of the Reform Committee are escorted to jail after examination at Government Buildings in Pretoria; their hopes for change dashed against cold stone walls. Dr Jameson and his men also find themselves prisoners after facing defeat at Doornkop - once heroes now shackled by chains. At The Grand Hotel in Pretoria, scenes unfold upon arrival as arrested members of the Reform Committee step foot onto uncertain ground. Whispers fill every corner as fear mingles with curiosity among those who witness this dramatic moment engraved forever in history's annals. A weary messenger rests at Chapmans Store on Johannesburg Road; news of Dr Jameson's defeat weighing heavily upon his shoulders.