Fraud Blocker Skip to main content

Imperial Light Horse Collection

"The Imperial Light Horse

Background imageImperial Light Horse Collection: After the Storming of Lombards Kop, Sir George White thanking the Imperial Light Horse for their

After the Storming of Lombards Kop, Sir George White thanking the Imperial Light Horse for their Services (litho)
1048669 After the Storming of Lombards Kop, Sir George White thanking the Imperial Light Horse for their Services (litho) by Dadd

Background imageImperial Light Horse Collection: Battle of Ladysmith, the Imperial Light Horse at Pepworth Hill to the Rescue (litho)

Battle of Ladysmith, the Imperial Light Horse at Pepworth Hill to the Rescue (litho)
1043355 Battle of Ladysmith, the Imperial Light Horse at Pepworth Hill to the Rescue (litho) by Charlton, John (1849-1917) (after); Private Collection; (add.info.: Battle of Ladysmith)

Background imageImperial Light Horse Collection: The Second Boer War (litho)

The Second Boer War (litho)
1600557 The Second Boer War (litho) by Holland Tringham, Joseph (1861-1908); Private Collection; (add.info.: The Second Boer War. Illustration for The Illustrated London News, 14 July 1900)

Background imageImperial Light Horse Collection: The Transvaal War, Scenes in Natal (b / w photo)

The Transvaal War, Scenes in Natal (b / w photo)
1599114 The Transvaal War, Scenes in Natal (b/w photo) by English Photographer, (20th century); Private Collection; (add.info.: The Transvaal War, Scenes in Natal)

Background imageImperial Light Horse Collection: The Transvaal War, Military Activity at Pietermaritzburg (b / w photo)

The Transvaal War, Military Activity at Pietermaritzburg (b / w photo)
1592898 The Transvaal War, Military Activity at Pietermaritzburg (b/w photo) by English Photographer, (19th century); Private Collection; (add.info.: The Transvaal War)

Background imageImperial Light Horse Collection: Panoramic View of the Battle on 21 October 1899, the Infantry attacking the Boer Position

Panoramic View of the Battle on 21 October 1899, the Infantry attacking the Boer Position on the Heights at Elands
1043479 Panoramic View of the Battle on 21 October 1899, the Infantry attacking the Boer Position on the Heights at Elands Laagte (engraving) by Nash

Background imageImperial Light Horse Collection: Imperial Light Horse (colour litho)

Imperial Light Horse (colour litho)
3639612 Imperial Light Horse (colour litho) by Charlton, John (1849-1917) (after); Private Collection; (add.info.: Imperial Light Horse)

Background imageImperial Light Horse Collection: The British Military Camp at Estcourt, which is being reinforced for the Relief of Ladysmith

The British Military Camp at Estcourt, which is being reinforced for the Relief of Ladysmith (b / w photo)
1593026 The British Military Camp at Estcourt, which is being reinforced for the Relief of Ladysmith (b/w photo) by English Photographer

Background imageImperial Light Horse Collection: Trooper of the Imperial Light Horse holding Chargers during an Attack (engraving)

Trooper of the Imperial Light Horse holding Chargers during an Attack (engraving)
1592996 Trooper of the Imperial Light Horse holding Chargers during an Attack (engraving) by Rowlandson, George Derville (1861-1930) (after); Private Collection; (add.info)

Background imageImperial Light Horse Collection: A Smart Corps of Irregulars, the Imperial Light Horse paraded at their Camp at Pietermaritzburg

A Smart Corps of Irregulars, the Imperial Light Horse paraded at their Camp at Pietermaritzburg (b / w photo)
1043288 A Smart Corps of Irregulars, the Imperial Light Horse paraded at their Camp at Pietermaritzburg (b/w photo) by English photographer

Background imageImperial Light Horse Collection: The Transvaal War, Officers killed and wounded (engraving)

The Transvaal War, Officers killed and wounded (engraving)
1592843 The Transvaal War, Officers killed and wounded (engraving) by English School, (19th century); Private Collection; (add.info.: The Transvaal War, Officers killed and wounded)

Background imageImperial Light Horse Collection: Captain Dummy, Sergeant Scarecrow, and Private Bogus, a Little Joke of the Imperial Light Horse

Captain Dummy, Sergeant Scarecrow, and Private Bogus, a Little Joke of the Imperial Light Horse (litho)
1599236 Captain Dummy, Sergeant Scarecrow, and Private Bogus, a Little Joke of the Imperial Light Horse (litho) by Woodville

Background imageImperial Light Horse Collection: The Transvaal War, Portraits of killed and wounded (b / w photo)

The Transvaal War, Portraits of killed and wounded (b / w photo)
1592904 The Transvaal War, Portraits of killed and wounded (b/w photo) by English Photographer, (19th century); Private Collection; (add.info.: The Transvaal War, Portraits of killed and wounded)

Background imageImperial Light Horse Collection: The Transvaal War, Scenes at the Front (b / w photo)

The Transvaal War, Scenes at the Front (b / w photo)
1593017 The Transvaal War, Scenes at the Front (b/w photo) by English Photographer, (19th century); Private Collection; (add.info.: The Transvaal War, Scenes at the Front)

Background imageImperial Light Horse Collection: The Siege of Ladysmith (litho)

The Siege of Ladysmith (litho)
1599465 The Siege of Ladysmith (litho) by Forestier, Amedee (1854-1930) (after); Private Collection; (add.info.: The Siege of Ladysmith)

Background imageImperial Light Horse Collection: The Battle of Elands Laagte, the Final Charge of the Gordons and the Imperial Light Horse (litho)

The Battle of Elands Laagte, the Final Charge of the Gordons and the Imperial Light Horse (litho)
1043309 The Battle of Elands Laagte, the Final Charge of the Gordons and the Imperial Light Horse (litho) by Small, William (1843-1931) (after); Private Collection; (add.info)

Background imageImperial Light Horse Collection: Unwelcome Attention from the Enemy, Gunners crossing the Klip River under Shell Fire (litho)

Unwelcome Attention from the Enemy, Gunners crossing the Klip River under Shell Fire (litho)
1048680 Unwelcome Attention from the Enemy, Gunners crossing the Klip River under Shell Fire (litho) by Charlton, John (1849-1917) (after); Private Collection; (add.info)

Background imageImperial Light Horse Collection: Sergeant-Major-Imperial Light Horse, 1900. Creator: Unknown

Sergeant-Major-Imperial Light Horse, 1900. Creator: Unknown
Sergeant-Major-Imperial Light Horse, 1900. The Imperial Light Horse was raised by the British in Johannesburg on 21 September 1899 for service in the Second Boer War

Background imageImperial Light Horse Collection: The Cattle Guard, from The Leaguer of Ladysmith, 1900 (colour litho)

The Cattle Guard, from The Leaguer of Ladysmith, 1900 (colour litho)
XCF143061 The Cattle Guard, from The Leaguer of Ladysmith, 1900 (colour litho) by Captain Clive Dixon (fl.1900); Private Collection; British, out of copyright


All Professionally Made to Order for Quick Shipping

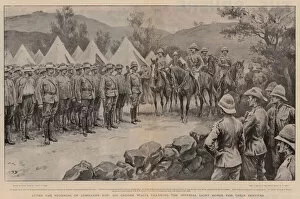
"The Imperial Light Horse: Brave Warriors in the Transvaal War" Step back in time and witness the heroic actions of the Imperial Light Horse during the tumultuous era of the Transvaal War. Through captivating black and white photographs, we catch a glimpse of scenes at the seat of operations, where these valiant soldiers fought with unwavering determination. One such moment frozen in time is captured after the Storming of Lombards Kop, as Sir George White expresses his heartfelt gratitude to these gallant men for their invaluable services. A lithograph immortalizes this poignant scene, reminding us of their selfless sacrifice. In another lithograph depicting the Battle of Ladysmith, we see the Imperial Light Horse charging towards Pepworth Hill to rescue their comrades-in-arms. Their indomitable spirit shines through as they fearlessly face adversity on the battlefield. The Second Boer War unfolds before our eyes through yet another lithograph – a testament to their unwavering commitment to duty amidst chaos and uncertainty. These brave warriors stood tall against formidable foes, leaving an indelible mark on history. Moving from black and white photos to vivid color lithographs, we are transported into vibrant panoramas showcasing military activity at Pietermaritzburg during The Transvaal War. We witness infantry attacking Boer positions on heights at Elands Laagte – a breathtaking engraving that captures both courage and strategy. A striking color litho portrays members of the Imperial Light Horse themselves – proud soldiers adorned in uniforms that symbolize honor and valor. They stand united as brothers-in-arms ready to defend freedom against all odds. As reinforcements arrive at Estcourt's British Military Camp for Ladysmith's relief mission, a powerful black and white photograph reveals hope amidst adversity. It serves as a reminder that even in times of darkness, unity can bring forth light. An engraving showcases a trooper holding chargers during an attack - a testament to the unwavering bond between man and horse.