Home > Arts > Artists > W > Caton Woodville
The Transvaal War, the Battle of Majuba Hill (engraving)
")
![]()
Wall Art and Photo Gifts from Fine Art Finder
The Transvaal War, the Battle of Majuba Hill (engraving)
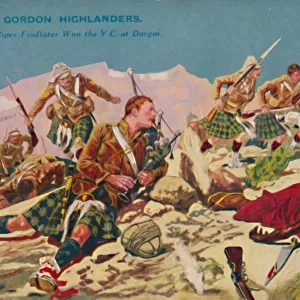
1590504 The Transvaal War, the Battle of Majuba Hill (engraving) by Woodville, Richard Caton II (1856-1927) (after); Private Collection; (add.info.: The Transvaal War, the Battle of Majuba Hill. Illustration for The Illustrated London News, 14 May 1881.
R Caton Woodville); Look and Learn / Illustrated Papers Collection
Media ID 22317210
© Look and Learn / Illustrated Papers Collection / Bridgeman Images
First Boer War Highlander Special Correspondent Standard Transvaal War Battle Of Majuba Hill
FEATURES IN THESE COLLECTIONS
> Africa
> South Africa
> Related Images
> Arts
> Artists
> W
> Caton Woodville
> Fine Art Finder
> Artists
> Richard Caton II (after) Woodville
The Transvaal War, the Battle of Majuba Hill - A Glimpse into History
EDITORS COMMENTS
. This print takes us back to a significant moment in history - the Battle of Majuba Hill during the Transvaal War. The engraving, created by Richard Caton Woodville II and featured in The Illustrated London News on May 14,1881, beautifully captures the intensity and drama of this military encounter. The image showcases soldiers from the 92nd Gordon Highlanders engaged in combat against Boer forces amidst the rugged terrain of South Africa. Led by Major L. C. Singleton, these brave highlanders fought valiantly alongside other notable figures such as Mr. J. A. Cameron and Sir G. P. Colley. The scene is filled with tension as smoke billows from rifles and cannons, creating an atmosphere thick with anticipation and danger. Each soldier's face reflects determination and courage as they navigate through this treacherous battle. Woodville's meticulous attention to detail brings every element to life - from the uniforms worn by both sides to the majestic landscape that serves as their battlefield backdrop. This print not only commemorates a pivotal event but also pays tribute to those who fought bravely for their respective causes during this historic conflict. It serves as a reminder of our shared past and invites us to reflect upon the sacrifices made by individuals caught up in war's relentless grip.
MADE IN THE UK
Safe Shipping with 30 Day Money Back Guarantee
FREE PERSONALISATION*
We are proud to offer a range of customisation features including Personalised Captions, Color Filters and Picture Zoom Tools
SECURE PAYMENTS
We happily accept a wide range of payment options so you can pay for the things you need in the way that is most convenient for you
* Options may vary by product and licensing agreement. Zoomed Pictures can be adjusted in the Basket.